Wednesday, October 26, 2016

Wet Wednesday!

I used to work with a lady who had a clever saying for every day of the workweek.  Her expression for Wednesday was "It's Wednesday, I must be in love!"

I'm not sure what that meant...

This morning it was raining when I got up, and it's supposed to continue raining for the balance of the day.  This is what the commute looked like. 


And it went very slowly!!  I was thinking about expressions that include rain:

  • It never rains but it pours - apologies to Morton Salt.
  • Rain check
  • Come rain or come shine.
  • Right as rain.
  • Save it for a rainy day.
  • Don't rain on my parade (or Streisand's!)
  • The rain in Spain falls mainly on the plain.
  • Listen to the rhythm of the falling rain...
Here are some from Pinterest:
  • When life gives you rain, wear cute boots and jump into puddles.
  • Life is not about waiting for the storm to pass, it's about learning to dance in the rain.
  • Some people create their own storms, then get upset when it rains.
  • Some people feel the rain, others just get wet. -- Bob Marley
  • Let your kindness be like the rain, that cares not about whom it falls upon. -- Talih al Habib
  • The best thing one can do when it's raining is to let it. (Sounds kind of like Yogi Bera!)
  • Without rain nothing grows.  Learn to embrace the storms in your life.

I think the last batch is very profound... 

Sew on!

Friday, October 21, 2016

Clouds

The other night on my way home, it looked like it might rain.  As I drove west through the suburbs, the most amazing cloud formation was right above my head.
 
While stopped at a long light, I turned on my phone and took a few snaps.  It was just in one area although the area was pretty big!  By the time I got close to home I had passed under it, or it had passed over me...
 
Isn't it beautiful?  I thought it might be a storm brewing, or that I might find the face of God somewhere.
 

You can see it was lightening up as I got closer to home.


What a wonderful world!

Happy Friday...

Thursday, October 20, 2016

Yo!

I remember people using the word YO as a greeting when they were trying to sound cool...  but this is something entirely different.  Whether it's cool or not is a personal opinion.

A couple of meetings ago the speaker at our local guild meeting was a lady who makes yo-yo quilts.  She patiently took us through the process, and some of us even executed one or two yoyos at the meeting.

I'm sure you know what yo-yo's are in the quilting world.  You take circles of fabric, and with a hand needle and doubled thread knotted at the end, you do a running stitch all around, and gather the stitches to the center of the circle at the front... or is that the back?  I don't know... I'm not a big fan of yoyos myself although I do know how to do them.

Circles can be tricky to cut well if you're using a scissors.  They have some fancy gadgets now that let you cut them by machine.  Sizzix has one, as do Fiskars and Olfa.  I bought one from TrueCut that I like a lot for large circles for applique.


You can draw around your favorite jar lid...

There are circular rulers.


If you're into production!!


Lots of folks use this one from Olfa.

Fiskars.

I have this one.  Disclaimer:  No one paid me to show this to you, or any of the others for that matter.
OK so we've solved the cutting conundrum.  So on to the hand sewing.  A lot of you are going "ugh" at the H word.

I don't mind a little hand sewing.  It's something to do when DH is watching sports or other boring TV but he really wants me to stay in the room with him.


To make one you take your precut circle and do a running stitch around the outside while turning under a little less than a quarter inch but slightly more than an eighth of an inch.  It doesn't matter exactly, as long as you're consistent.

There's even an "app" for that, a sewing APP (notion) from Clover.  So far I've resisted buying one.  It tells you how big to cut the circle and helps you get the stitches even.  I've even seen them for shapes other than circles.

I get no money from Clover for showing you this notion either.  Clover, are you watching??  Call me!

Then you sew the resulting finished yoyos together at four 'corners' to make a piece big enough for whatever it is you're making.  This piece is shamelessly borrowed from the internet.  I don't have enough made yet to even sew two together.


So for me, making a whole bed quilt out of yos - I doubt I'd live long enough to complete one.  But they are kind of cute, and you might make something cute from them, once you have enough.

Here are a few ideas:

Toys - always cute...

The right girl would have to like this...

Table topper?

I could do this for the holidays.  Especially if I start now!

Sew on...

Monday, October 17, 2016

Not a Happy Weekend...

I am so not a happy camper...  yet!
 
If you remember the saga of the jean jacket patches and my bent sewing machine from a couple of weeks ago, you know that I sent my machine in for service.  It came back quickly and I was very happy that it didn't cost me the proverbial arm and let for the repair.  That post was on Sept. 28.
 

And the result was a naked bobbin case, with no cover.  After several calls back and forth, the part was supposedly ordered.  I say supposedly because this was a conversation that took place between someone at the repair shop and my husband.

I trust my husband with my life.  Everyone else has the benefit of the doubt the first time.

Here's my machine, on October 16, bobbin still naked.  "Viking parts have been very slow coming in".  Uh huh.


I have projects all cut and ready to start!  Like this table runner.


Oh I have other machines, so it's not like I can't sew!  But my Viking is my main workhorse and has all my favorite tools and lights attached.  It's what I use when I want to blaze through projects.  It's also set up in my favorite sewing spot, and weighs about 32 pounds so moving it is not a fun job.

Last night I found an on-line parts vendor that has my little bobbin cover in stock and it will ship today.  Of course I'm going to pay twice as much plus shipping, but at least it will be in my hands.  In a matter of days, not weeks.

So what's the matter with my repair shop that they don't have access to Viking parts?  Maybe they just want to sell new machines or something, I don't know.

Color me disappointed... I would much rather shop locally than on the internet, but if I can't get what I need, I will reach out to the web.

Now I need time to get down into the studio and get sewing.  My next big project is Miss A's confirmation stole.  We worked out all the designs yesterday, and the big day is two weeks away so I need to get to work.

Sew on...

Monday, October 10, 2016

Table Runner Experience

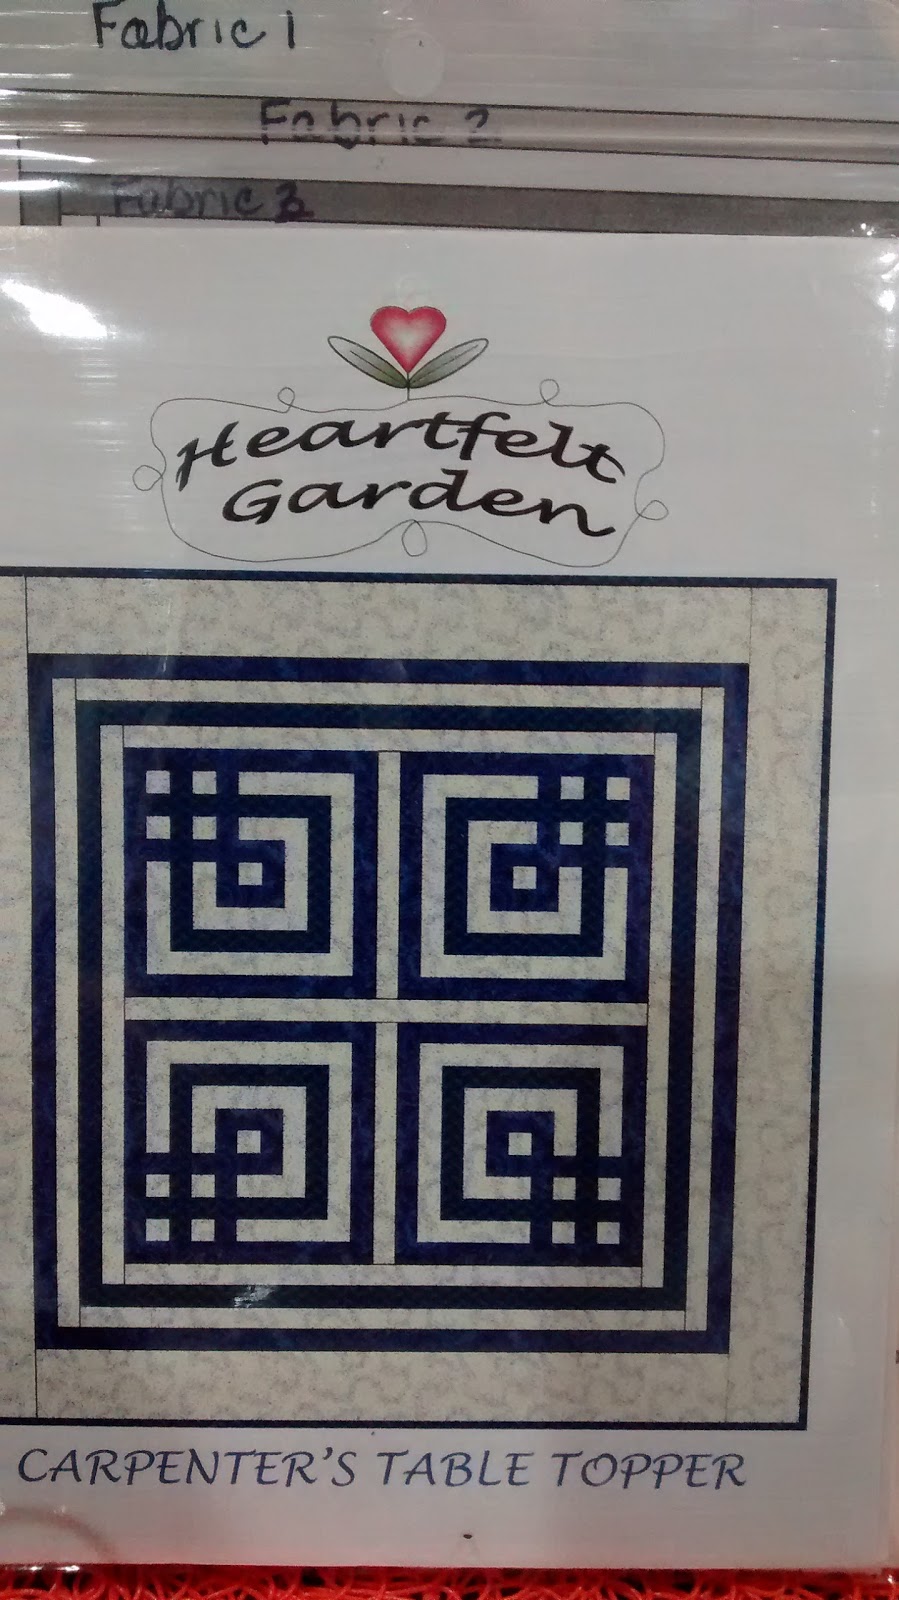
Last week I blogged about doing a kit for this Heartfelt Garden table topper.  On Friday I took the kit over to my aunt's house.  I took some PTO in the afternoon (the year end process will do that for you) so we had some 'alone time' to work on it before the rest of the bunch arrived.


Aunt Z was doing the sewing, and I was just organizing and assisting.  I will say this -- while everything you need to do and know is in the pattern, if you don't READ each step in both words and pictures, you can miss something.

For instance, the drawing on the left in the second row (step 5) shows piecing a portion of the next round of the block.  Then step 6 says "add unit made in Step 5 and E1".  That's it.  You have to look at the drawing to see which piece to add on which side.  OK most of us get that, but it could have been explained in just a little bit more detail...
 
My observation is that since it doesn't say sew to left side/right side, there is opportunity to do it wrong and then spend time scratching your head as to why it doesn't look like the drawing.  What with going up and down between machine and ironing surface, it can happen quite easily.  As me how I know...
 
If you followed the cutting and sorting instructions to the letter, you'll know exactly what your E1 unit is, but if you think you're going to skip that step, well, just don't do it!  You might find yourself a little confused since the pieces are not cut in order of size.  C is the smallest, then G, then -- well you get it.

Keep piece size and fabric number handy, it will help!

The pattern tells you to put all your pieces into baggies for ease of finding the right piece.  We tried that but the baggies were slippery.  We tried clipping them together in order but that made opening them a challenge, plus a binder clip damages the baggies. 

Aunt Z had a pile of envelopes on her table that she was getting rid of, and we had the brilliant idea of using them instead.  Brilliant because they could be placed in a small carton or tray and they stood up whether open or closed, which made pulling out the pieces a lot easier!

For this project we found chain piecing better than doing one quadrant at a time.  And we thought that this project is best done for the first time either alone or in a small group so you can concentrate or with everyone who's there working on it at the same time.  By the time the rest of the crew came and added their 2 cents' worth, we pretty much knew what we should be doing.

Not that that guaranteed that we wouldn't make errors!! 

Sorry, no photos of the work in process this time, my phone was on life support by the time we got that far.  We should finish up this Friday and I'll post the proud owner with the finished product.

Here's Miss E ready to go to the homecoming dance... in her newly hemmed gown.  I had to trim the back of the overskirt so she could dance without tripping on it, since street shoes were not allowed n the gym.


Sew on...

Friday, October 7, 2016

Color/Value -- This is a Neat Trick!

There have been many bloggers talking about color value.  I took a class several years ago with June Coburn on color theory.  She led us through several exercises to do color value analysis.  I have retained some of it, and try to remember what she taught us that day.
 
I think I have a pretty good color sense and memory.  It's like my eyes remember a color of fabric or yarn I have and I can come pretty close to picking out things that coordinate, even if I don't have the original fabric with me.  Sometimes I fail but mostly I do OK.
 
I was cleaning up a bit in the church guild supply cabinet last week and I set things into general color families on the table.  Things are easier to work with if they're organized.  The reddish stripe landed next to the star fabric.  You can't see it too well but there's a green stripe in that fabric.


The fabric to the left of the stripe is green leaves.  It's a pretty good blend.  We have this pattern that needs six colors of strips, so I pulled in the tan and the white, and that floral with the gray background because there's green and tan and white in it.
 
I was not exactly thrilled with that final, because the gray kind of made groaning noise with this combo.  I took the pile home and found the far left fabric, which is really much more gray than blue as it shows in the photo, but that's my basement light fighting my camera.
 
So now I have seven fabrics.
 
I made the photo black and white.  There's only one dark fabric, the green leaves fabric in the center.  Four fabrics read as medium and two are light.


General thinking is that most people tend to buy mediums.  Some of us have to struggle to pick up lights or darks.  If you see the fabrics in color, you see differences.  Red is not green, blue and green can be differentiated by most human eyes from yellow...
 
But change them all to B&W, and some things kind of run together.  In the picture above, the stripe, the stars and the florals have flashes of white attached.  Depending upon the amount of white, the values can read as similar or you might see contrast but the difference is not as noticeable.  Light is light but the only fabric that reads as dark is the center fabric.
 
That still makes a lovely quilt, but might be classified by some as low volume or low contrast.  And that's OK, that might be just the look you want! 
 
The quilt that comes out of this group will still have contrast.  I'm still thinking that I might need to pull those two fabrics with gray out and come back with something very dark, like forest or black, that either is solid or reads as a solid.
 
It remains to be seen how this one will turn out.  This is not my general color wheelhouse but that reddish fabric appeals to me for some reason.  I think I'm going to like it if I make the right choice on the sixth fabric.  Stay tuned!
 
Sew on...


Thursday, October 6, 2016

The Latest Project

When I don't have a book to read or a meeting over lunch, I love to browse the web for quilt blogs and see what others are doing in social media.

Beware -- a tangent is just ahead!  Social media to me seems like a very unsocial place lately.  Mean tweets, cyber-bullying, sexting that goes viral -- anything going viral!!  Can you think of anything less meaningful?  How about meeting up with some friends and chatting Face To Face??  How much more social is that?  LOL!  (She says as she blogs.)

So I've been seeing this sidebar icon recently that says "I took the process pledge".  I wanted to know more.  I always want to know more, but this pledge looked like it was going to deliver.


Clicking around, I found the original posting.  Dated May of 2010, the idea came from a quilter in Michigan.  She wanted people to post the process of whatever they were doing, not just a photo and comments on a finish.  I thought, what a lovely idea!  Like someone willing to help you do what you do. 

People are still linking up and taking the pledge.  There are as of today 980 bloggers who signed up to take the pledge and linked up.  However, and you knew there had to be a however, didn't you?

I clicked on several of the links in the 900-980 range, which would appear to be the most recent, and what do you think I found there?  Almost to a fault, the ones I viewed had photos of finished items and very little illustrated process.  Disappointment reigns.

IMHO when you take a pledge it's a promise, like a Scouting oath or the Pledge of Allegiance.  I hope that I haven't promised something and then didn't make every effort to deliver. 

Mom always said "don't make promised you can't keep" and "never break a promise to a child".  For the record, I didn't take the pledge but I'm trying to keep it!

This is my current project... my aunt bought a pattern at the WPS quilt expo to make a table topper.  It's super cute.  I'm sure you can pick it up at any quilt shop or google it and order it online.


When she opened it up, she got a little intimidated by the cutting directions.  The pieces are small -- one and a quarter inches wide.  She has trouble with rotary cutting anyway due to having had glaucoma so she asked if I would read the pattern and cut her a kit. 

The piecing directions don't look all that difficult if you have the pieces organized. I made myself a chart and started in.


The pattern recommends that you mark the pieces and separate them into baggies.  This turns out to be a very helpful idea.


 Because some of these pieces are really small...

 
So far it's been fun.  I really love this part of the quilting process, planning the fabrics, cutting the pieces, even reading the directions! 
 
I'll let you know how the sewing goes when we get there...
 
Sew on!

Wednesday, October 5, 2016

Good Gramma, Bad Gramma

Yesterday we were hosting Miss A overnight.  Miss E was at the beauty salon having her eyebrows waxed because Homecoming is this week and she's a whoop de doo freshman this year.

This girl will seriously know some poor fellow or fellows for a loop when she shows up for the dance on Saturday night in the dress she bought...


Tell me that's not a heart-breaker in the making...
The dress is a knee length sheath covered in lace, with a sheer overskirt that is split in the front and gets long in the back.  With her shoes on, it's a perfect fit and just the right length.  But the dance is in the high school gym, and they aren't allowed to wear street shoes on the gym floor.

Can Gram shorten the skirt so it doesn't drag when she's barefooted?  Yes, I certainly can do that.  So last night at 8 p.m., when the VP debates started, I took myself down to the lower level sewing studio to work on it.  Good Gramma. 

Miss A was upstairs watching something suitable for children on the TV in the den.  Her normal bedtime is 9 p.m.  DH was on the main level watching something unsuitable for children or wives, definitely not politics.  He likes scary movies and we do not. 

Miss E had gone back to her house and was probably doing homework and watching the dog.

It was very quiet in my house.  The dress was holding all my attention.  At around nine thirty p.m. DH yelled down the stairs that he was going up to bed, and I should turn the lights off when I came up.

Suddenly I remembered that Miss A needed to be in bed a half hour before!!  As I ran up the stairs I could see that all the lights were on!  I said to myself: Bad Gramma!!  She's been up an extra half hour and she's going to be cranky in the morning.

DH was in the guest room, tossing a quilt over a prone figure laying on the bed, and turning on the night light.  We looked at each other and started laughing.

Miss A was sound asleep, in the clothes she was wearing when she came over.  Evidently she either put herself to bed without changing into PJs or fell asleep reading on her NOOK with the overhead light on.

We turned off the room light and went back to our respective tasks.

Good thing she's a self-directed work team!

Sew on...

Monday, October 3, 2016

Fun Stuff!

Sadly, I've been unable to find the bobbin hatch cover to my Viking... boo hoo!  I'm calling Frank's this week to see if they have one or can order it...

My naked bobbon...  :-(

Good think I have other options for sewing, because look what came to my house last Thursday!  A box full of quilty potential from Mary Mulari at Mary's Productions in Aurora, MN!


And check out the cool box it came in!!   Pacific Northwest Fish decorations were all around the sides of the mailing carton.  I'm saving this baby!  It's too cute to recycle.


I got 35 fat quarters, the whole Mary line from last year and this year, both Chatterbox and Church Lady, along with a lovely kit for a Church Lady's Apron.  Here's a link to the pattern, and Mary's lovely artwork:

http://www.marymulari.com/patterns/Church_Ladies_Apron_pattern

Can't wait to get it sewn up and show it at my next guild meeting.  (P.S. I didn't get any financial consideration for linking up but I do love what Mary does and have no trouble recommending it!)

Sew on...

Friday, September 30, 2016

A Study in Contrasts

I'm always amazed by the infinite variety of choices we have as modern sewists... how does anyone begin a project when the number of fabrics we can choose from these days goes way beyond the imagination of our fore-mothers who quilted from scraps.

ROY G BIV just doesn't begin to cover it.

I was thinking about this while perusing the Splendid Sampler site this week.  http://www.thesplendidsampler.com/

This sampler/group project is being run by Moda's crack team of Pat Sloan and Jane Davidson.  Well, I'm not sure they're actually "Moda's", but you get it, I'm sure. 

There will be eighty-some blocks of various types, pieced, appliqued, embroidered, etc.  And there are bonus blocks and projects using the bonus blocks.  If you worked on these free patterns for a year you would not run out of things to make!

There are two blocks revealed each week. Block 66 is designed by Vanessa Goertzen.  It's a variation of pinwheel plus flying geese.  Her fabric choices are so great, a navy, a light blue print and a white fabric for the geese.  The geese show up splendidly (pun intended) against the navy.

If you go to that site you can scroll down and see photos of the various blocks made by some of the participants, with their color choices in all their glory.

I'm not doing the SS -- YET.  I'm accumulating the patterns, and take them out for viewing when I need eye candy.  I want (need) to get some of my UFOs off the list and onto the F list -- that is finished... before I start something new.

Famous last words.

I pulled out my box of Phone Guy's Wife blocks.  I'm embarrassed to say how long ago these were started.  I'm going to try to make this one my October OMG (one month goal)...

This first block illustrates what I saw when I looked at Block 66 of the Sampler, dark, medium and light, all clearly defined and the contrast is evident.

High contrast, good balance.
This bow tie looked OK in person, but in the photo it's a little muddy... I should maybe have used a much lighter color than that light green solid.


In this block, same thing, the in-person differentiation is better than the photo.  Maybe I should have used the same fabric in the four quadrants and put a sunflower in the center??


Ugh, this one is just awful in the photo.  The dots are really white, and the center and corners are cream with green.
 

When I had them all up on the design wall all those ages ago, you can point directly to the stuff that doesn't work...  row two, block one.  Row three block two is the one above.  All that work of cutting and piecing those little squares and you can't even tell which is which.
 

The way I'm actually setting these is below, white sashing and dark cornerstones.  It helps a little, I think.  Trouble is, I ran out of the white and dark green and need to find something to match, or at least not clash with, what I already have sewn together.  More on that later.  Hopefully.


This is a twisted bargello that I started also in the year 1... and here's an illustration of why you should step back from your design wall to see what's really going on.  See the strip in the center, where the colors don't line up going across?  I think I had a couple of the strips upside down or something because clearly this was not the pattern as the designer intended...
 
See where the design went haywire?  Luckily I saw it in time...
I finally got this wall hanging sewn after a long hiatus -- I think it was maybe three years ago now.  But it's been in the UFO box ever since.  Really, there's no excuse except that with the effort it took to put it together, I got a little tired of it.

I think I'm ready to return.

I think it's beautiful... and it's all sewn together, just needs layering and quilting.  I can't decide if I should send this out or attempt it myself.  I'm calling this one my November OMG. 

The kit was assembled for me by one (or more) of the Quilt Angels at Quintessential Quilts in Reedsburg.   I love the gradations and the transition from brown to teal.  Just the right balance of contrast.

Time to get to work...

Sew on!

Wednesday, September 28, 2016

Yes But What Have You Done For Me Lately?

I'm working on a big intranet project with my company, trying to learn new things like how to post things to an intranet site, and how to organize pages so people can find things easily.

Big job... easier said than done too.

Just like I said about the sewer systems years ago when I started working for Water Engineers, I know way more about the internet now than I ever wanted to know!  (Note to self, it's a lot more pleasant than learning about sludge, wastewater and the like!!)

So that's keeping me hopping, and with family obligations I haven't had much time to spend in my sewing studio lately.

DH and I celebrated 45 years of marriage last Sunday...  and those years seem like they just screamed by me like Secretariat!!  I don't feel a whole lot different than I did back then.  Well except for the aching knees some mornings, or when it rains, or the exhaustion after a late night or several.  OMG when did I get OLD??  LOL!!

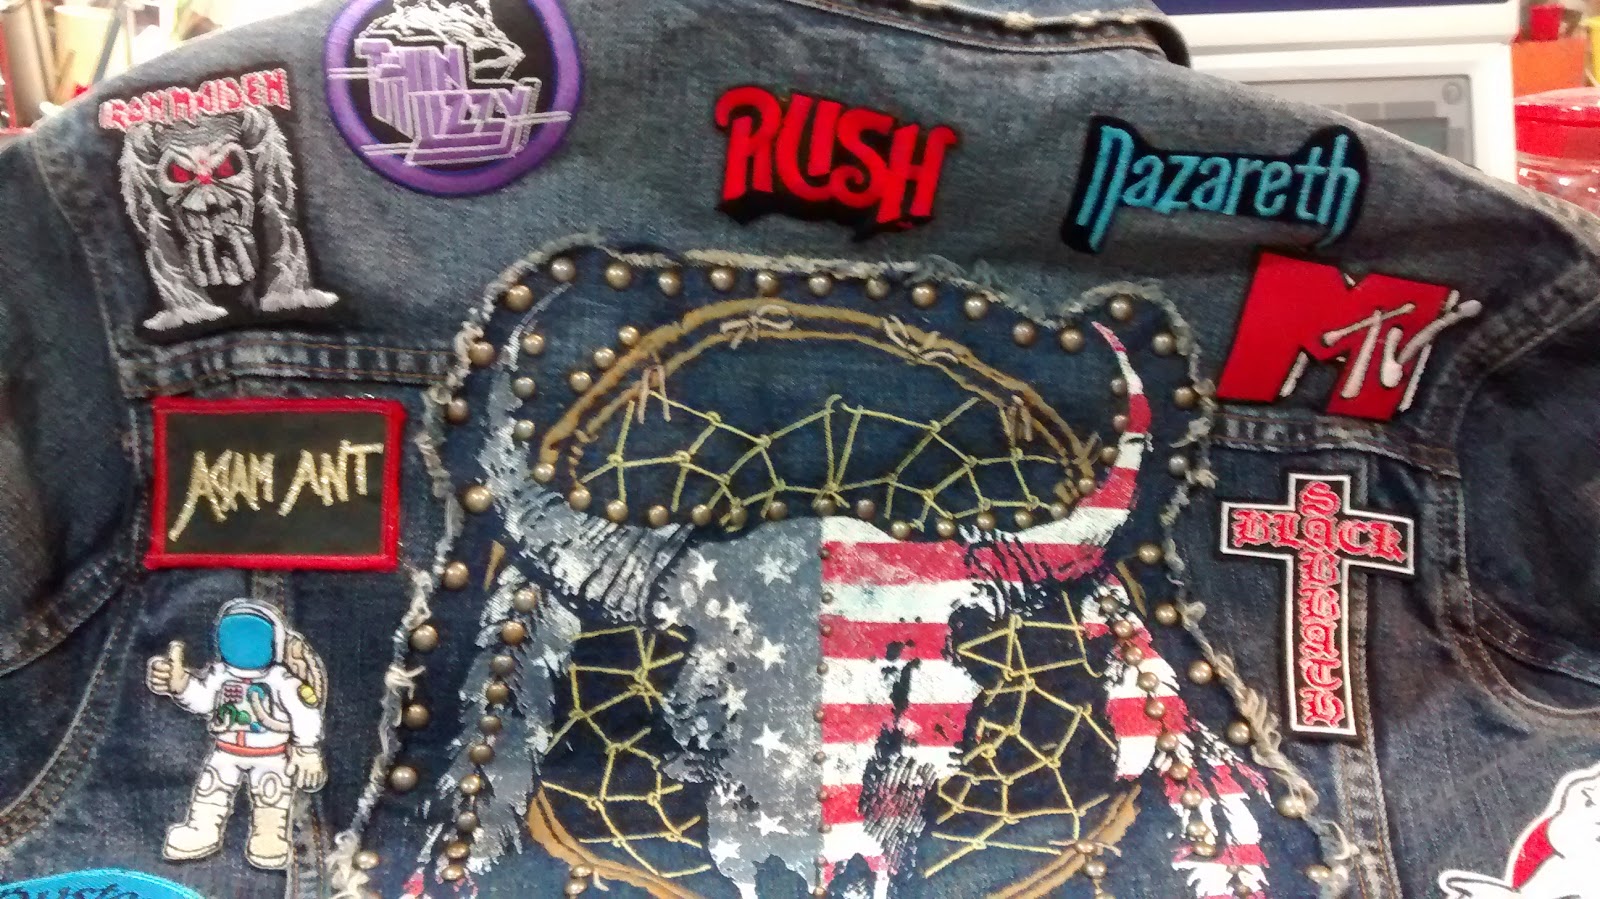
This is my latest project, the denim jacket patches for a coworker...very colorful.  There's one patch for every band he's seen live and in concert.


Do you see the cross on the right side of the photo above?  It says Black Sabbath.  It crosses a seam. Before I realized that I was doing it, I stabbed the needle down and it bent.  It didn't break, but it bent further to the right than I thought was possible.

Maybe the band name was an omen!!!   (music from Jaws...)

I put in a new needle, moved over, took another stitch and BROKE that needle.  I pulled everything out, changed the needle, and rolled the flywheel gently to see what was up.  The needle was hitting about a sixteenth or maybe a thirty-second of an inch behind the hole in the sole plate.

I bent my machine!  OH NO!!  (sounds of groaning...)

OK, that cannot be good.

DH took the machine to our local repair guy at the wonderful Frank's Sewing Center the next day.  I worried... what if they tell me they can't fix it?  Because I have done this before on this machine -- I braced for the bad new.

Three days later, they called and said it was fixed.  They left a voicemail, and didn't leave the cost in the message.

OK, bracing for the worst... DH went and picked it up.  When I got home from work I looked at his face, searching for the bad news that he had to take a second mortgage to pay for the damage I'd done...

<pregnant pause for drama>

It was only about $15 more than what it cost to have it cleaned and serviced for its annual checkup!!  Which they also did while it was there -- Brad, I love you man!!

The rest of the patches are below.  Enjoy the tour!


BTW here's a little app I have on my phone that will do a collage of the photos I have in my gallery.  I thought these pics from the Madison Quilt Exp made a cool grouping.


Last but not least, I used my Joann's 60% off coupon to replace my June Taylor Shape Cut last week. Now I can say goodbye to the broken piece...


Sew on...