Friday, September 12, 2014

On the Needles

Last week I got a bag of freebies at the gathering of the sewing sisters... the stuff outside of the plastic bag was a donation from my auntie who was cleaning out her sewing room.  She's preparing to put some additional cabinets in there, so she emptied the whole room to clear a space.  She says she's only putting back what actually is intended for projects.  I am the beneficiary of some of the overflow.  These partial skeins of pastel yarn will make some very nice doll items.
 

Actually this picture is of stuff sitting on the end table at my house.  You can see my toes at the left, and they look mighty far away!!

What I was knitting last night is another doll sweater.  This one is with self-striping yarn.  I wound two balls with what remained from knitting the back, and I did a pretty decent job of lining up the stripes on the two fronts. 
The sweater fronts laying sideways in my lap.
 You do that by unwinding enough of the yarn to match the next color change, then back up to the shortest end and cut the longer one to match.  Then you cast on the same number of stitches from each ball of yarn respectively.  Being a few stitches off is no big deal, but they should line up fairly well.  These will match better after the pieces are blocked.


Then I sew the pieces together at the shoulders and pick up the sleeve stitches along the edge.  The trick is always to mark the 'ending' spot for the sleeves in the same place on both sides of both sleeves -- 4 matching points!  On stripes it is just a little easier, but it's important to get it right.  If you don't, when you sew up the side seams you'll have a tough time.

Ask me how I know this!  <wink wink>

Happy birthday tomorrow to my favorite son. 

Son behind the tree -- grandson with big fish!
Keep calm and knit on...


Wednesday, September 10, 2014

Utility Sewing and a Patty Project

Sewing is a life skill that is so useful in the general stewardship of all your worldly goods.  I'm glad I know how to do it, and so are many of my family members.  However, sometimes the challenges are too great.  And I am not the world's biggest fan of mending. 

The darning stitch by hand...  Not my thing!
Last night I was out at my quilt guild meeting so I got home late, after most of the household was in bed.  My hubby said Miss A was over looking for me to fix her sock.  Now with Miss A, who has been known to wear her socks outside without her shoes, this can be anything from a tiny hole in the toe to reconstruction.


I didn't see the sock, so I can't tell if the circle my husband made to illustrate the hole is right, but according to him it was humongous!  He said the entire heel was gone... although if he's told you any of his fish stories there is some doubt, if you know what I'm saying.

He told her it couldn't be fixed.  She said "Gramma can fix it!  These are my favorite socks!"


We'll see.

Two of my sewing cousins have a sister who doesn't sew.  She's the baby of the family.  Isn't that normally the way it goes?  She brought several projects over the last time we had sewing night.  Nancy took the pants and I took the top and a swimsuit cover-up.  THAT was going to be a challenge. 

I love a challenge!

Patty bought this garment in Hawaii and she's sentimentally attached to it.  And I was hoping to help her get one more cruise out of it...

It was one of those colorful tropical sarongs and she's been wearing it for a number of years so it's nice and soft.  And thin.  Very thin.  The fabric is loosely woven to begin with.  The two cut ends are fringed with about a dozen or so threads pulled into a knot every inch or so along the entire length.  These are natural tearing places!

There was a quarter-sized hole in one spot further into the garment, and a six inch tear along one side, at the spot where I am sure she ties it together at the hip. 


Big shredded tear right up the dolphin's back...
The only thing to do was to reinforce it and hope that the other non-reinforced parts don't tear in protest.
 
I had purchased some silk organza on my fabric acquisition road trip.  I cut a bias strip, rounded the edges and laid the cut area on top, right side up, pinning very carefully.  Bias cutting was to keep it from raveling.  Silk organza was to keep the patched area soft, because now she's going to have to wear the patch inside against the skin.
 

I don't know if you can tell from these pictures, but the fabric does have a right side, the black is a bit brighter.  I had a choice of using black thread and having it show on the yellow, or using yellow and having it show n the black.  I decided that the second option was least distracting.


Inside
Outside


I tried the mending stitch on my Viking but that was too much thread weight.  I ended up sewing with a multiple step zigzag stitch.  Then I put a line of normal zigzag on the two fringed edges just to help in case any of the other fringes decided to separate from each other.
 
Then I made a round patch and used the zigzag stitch to fasten that in place on the hole.  That was mostly yellow so it didn't show much at all.  At least it won't get any bigger.
 
Patty was leaving on the cruise the next weekend so I dropped it off and told her to have a good time.
 
And PERHAPS look for a new sarong when she reaches those tourist market place!  Even the best mended garments only last so long.
 
Sew on...

Thursday, September 4, 2014

Sewing Methods

When I'm in a sewing mood, I want to just sew... that is, I want to sit down at the machine and make something.  I don't want to be planning or choosing or cutting out.

Sometimes I want to be in my sewing room but I don't want to sew.  That's when I do that planning, choosing and cutting.

For doll clothes, especially if you're going to be selling them, it's good to have a large quantity of things cut out, because the sewing isn't very time consuming.  It's not like making a garment for a real person, where fitting might have to take place.  The doll clothes fit, and if they're a little loose or a bit snug, the doll does not complain!

Usually I make the same thing multiple times.  I have my favorite top, dress, skirt and pants patterns, they fit well on most of the 18" dolls and are easy to make.

In order to keep the patterns in good shape, I often trace them out onto a non-woven gridded pattern paper.  Some of this product goes by the name of Swedish Pattern Paper.

After lots of cutting, the corners of small pieces can get kind of ratty looking.  If you're not careful cutting, your pieces can get smaller the more you use them!

See how the edges curl up?  And the side seams are losing a little width.

 
I traced my favorite doll skirt pieces onto the pattern paper.  This stuff actually sticks to many types of fabric so pinning can be minimal.  Too many pins in tiny pieces can distort the fabric so you get seams with jags or points.  You can sew around them but then your seams look messy unless you're using the serger.
 
Tonight while the football game was playing upstairs, I watched Project Runway and sewed 9 pairs of leggings and two tee shirts for my craft fair stock.  I was not impressed by the show, however I am getting lots of things done for the October craft show!
 
Sew on...

Tuesday, August 26, 2014

The Shopping Trip

My two best shopping buddies and I recently went on a Fabric Acquisition Road Trip.  Yep, we spent a whole day f.a.r.t.ing around SE Wisconsin!

I picked up a few things at the Ben Franklin in Oconomowoc.  Gosh, I love that place! 

Some yardage for doll clothes and/or Miss A -- think Angry Birds pj bottoms...


Tulle for some tutus.
Then we toddled on over to Gayfeathers in Madison.  I got some olive green twill for slacks and a black and white plaid wool for a jacket -- not to be worn together!!  But I'm tired of wearing black pants all the time, so I got something different -- the olive and a dark gray. 

I love the selection of garment fabric.  The owner, Virginia, is a friend of sewists everywhere.  But be warned, the shop is in an old building, so if it's hot, plan to sweat a little.  She has an air conditioner, but this is definitely not a chain store.  But I believe in supporting the small merchant and she definitely caters to garment sewing enthusiasts. 

I also found a red batik that I need for cornerstones on my red, black and white quilt top, and some cute cotton with hedgehogs on it.

From Gayfeathers -- hedgehogs!!

After lunch, we made one last stop at Mill House Quilts in Waunakee.  They're paving Main Street in Waunakee but we didn't let that stop us!  Thank goodness for back roads and google maps!  This shop is not to be missed.  The display of samples is amazing.  They always have something hanging up that will inspire you. 

From left, four fat quarters and the rest is yardage.
From Mill House I picked up some fat quarters, and four prints from the bargain room, plus Badgers and Packers fabrics. I just realized that in my photo the Packer fabric is upside down!  Oh well... 

The florals and the blue dots and pink plaids were 20-30% off.  If you go to Mill House, and you should, don't go looking for the florals because I took what was left on the bolt.  The black is destined for a skirt for Miss E.  The blue became a table covering for my Sunday School table on Sunday morning but will be repurposed into some cute pjs for Miss A.  She must have grown three inches this summer, soon she'll be as tall as me.

After we got back to where we parked our cars, Marlene and I took a jaunt through the River Boutique yarn shop in Brookfield.  OMG you cannot believe everything that is in that shop!!  Check out their web site.  They invite you to bring your knitting in when you visit... I hope to visit again soon when I have more time.

http://www.riverboutiqueyarn.com/

It's fabulous, even the chairs have sweaters.  I kid you not.  One chair had a sleeve with a hand sticking out of it -- a glove mannequin, I am sure.  But you could spend hours just looking at the displays.  They have a bargain room which I did NOT enter for fear my credit card would curl up if I did.  I did pick up a few skeins of to die for fibers but those are for another post.

Now to get to stitching up all this wonderfulness!

Sew on...


Thursday, August 21, 2014

Getting Organized in the Fall

There's something about fall that makes me want to straighten up.   Maybe it's having to switch wardrobes around, and I'm getting tired of the summer clothes or something.  Although this year what has passed for summer in Wisconsin is not what I'd call a good example of warmth!

My pal Suzi and I took over the church quilt group when our previous leader had to step aside for health reasons.  Last year someone purchased for us a nice cabinet so we could store our fabrics in an accessible fashion where previously we had only boxes and bins.

With the addition of a few stashes that have been donated recently, we have the cabinet filled.  Not to bursting, but it really needed organizing.

We meet one Saturday a month.  During the summer lots of folks take off, so one Saturday when we met the ladies who do the actually quilting were both gone.  That meant we had no pins!!  So no sandwiching work was to be done.

I thought we could make good use of the time by organizing the cabinet.  We unloaded the shelves, unfolded and inspected each piece, and refolded each piece that we were keeping, organizing the pieces by size and color or theme.

Top shelf--less than a yard on the left, a yard or more of solids or what reads as solids in the other three stacks.  Second shelf left to right -- kid prints, a yard or more of our florals/other prints.

This is the bottom half -- the upper shelf has bundles we tied together for potential kits, and some large pieces potentially for backing.  The bottom shelf is also backing pieces, sheets, and pieces of polyester blends we sometimes use for specific charity items.

a close up of our 'kit potential' stack.

All these florals!!  And you'd think we would have more pink...

I sorted our solids by color to see what we need.  I think we need more green!!
We also have a bin where we keep pieces of muslin and our light neutrals like white and cream.  A small bin holds our notions (we use a ton of masking tape!) and another bin holds bundles of binding and our pattern library.

Then there's the strip bag -- or bags as the case may be!  I didn't take pictures of them because they're MESSY!  But they get put to good use in string blocks.  I think string blocks are like butterflies.  The strings and the foundations don't look like much.  Sometimes even the blocks don't appear to be very impressive.  But when they're sewn together in a quilt, they just sing -- or I guess fly if you want to stay with the simile.


Sew on!!

Tuesday, August 19, 2014

More Knitting

Last night I was too tired to knit, but here is a picture of what I did over the weekend...


Oh dear!  No matter what way I import this picture, it goes sideways.

Can you turn your head to the left to look?  LOL!

Knit on...

Friday, August 15, 2014

If I Were A Better Blogger...

I was reading some favorite blogs and thinking about how great some of them are at being instructive and showing their work... I love those blogs (and those bloggers).

Here's what happens to me:  I think about something I want to write about, something that happened, something that I want to save to remember, and then I think, oh gosh, I should have taken a picture of that while I was doing it.

I have a camera or two at home and one in my phone.  I usually have the phone here:


Bottom drawer of my desk, phone in the pocket.  Or next to the back door... to grab on my way out.
I am not into selfies... believe me, the fewer pictures that exist of me, the happier I am.  I could lose a few dozen pounds.  But taking pictures of my work in progress, well, I guess I am not a photographer because I'm usually so busy doing that I forget about recording.

Tonight I was thinking about my craft fair stuff and about how my selling point for the doll clothes is that they're garment quality fabric and well made, machine washable and they will stand up to a lot of play.  How do you illustrate that? 

When you buy clothes, do you look inside to see how well they are made?  I do.  After being burned by garments whose hems get wavy upon washing, or where the seams are so tiny they pull out, I always look inside.  I have a lovely jacket from Coldwater Creek that pulled apart in a back seam, and I am struggling to figure out how to fix that, but that's another blog.  (If I remember to shoot pics while I'm doing it!!)

When making small things, you use a correspondingly small seam allowance.  Instead of sewing and trimming you just cut smaller.  A doll's armhole is only about 2-3 inches long, and the curve is quite sharp.  So when I sew dresses, instead of using facings I will cut double front and back bodices, then sew each one separately only at the shoulder seams, leaving the side seams open.  I put them right sides together and sew up the center back, around the neck and down the other side.  Then I sew both armholes.  Then I CAREFULLY clip into the curves up to but not through the stitching.

Since I didn't take any pictures of this process, I made some VERY crude drawings... I'm sure you can find some much better pictures on YouTube somewhere if you don't understand what I've got here...
This actually says "1/4 inch seam allowance, flat bodices right sides together. and it's #1 in the circle.
 Then I turn the piece right side out through the bottom of the bodice front.  I press very carefully because the pieces are so small and you can burn your fingers.  Well, I can...

The paper says Wrong side, honestly, I can spell. 
 The result is that you have a bodice with all curved edges enclosed.  I then turn it back inside out and put the side seams right sides together and sew up the lining and down the right side on each side and press that.  That's in illustration 2 above.  See my arrows with the sewing direction on them??  ;-)  You are sewing the front and back together at this point, but you're sewing lining to lining and bodice to bodice  -- bodice first, up over the armhole seam and down the lining, or vice versa.

Sew the top to the skirt by putting the top inside the skirt right sides together.  Sew the skirt to the bodice but not to the lining.  Ugh, my scanner!!
 
After pressing and turning right side out again, I put the top, right side of bodice against the right side of the skirt.  The skirt will be inside out at this point.  If it's a gathered skirt, I pin the heck out if it to keep it together and to keep the gathers smooth.  I also make sure the lining is pulled away from where I'm sewing so it doesn't get caught.  These pieces are SMALL so go slowly and carefully!

Insert the waistline seam into the bodice...that last word is topstitch.
 
The last step is to tuck down the bodice lining, fold it over and topstitch it to the skirt.  Depending upon how much is showing between the lower armhole and the top of the skirt, I may turn under a little more than a quarter inch for this seam.  And because I hate messy, I like this method that covers up all the raw edges. 
 
Here it is in real life:
 
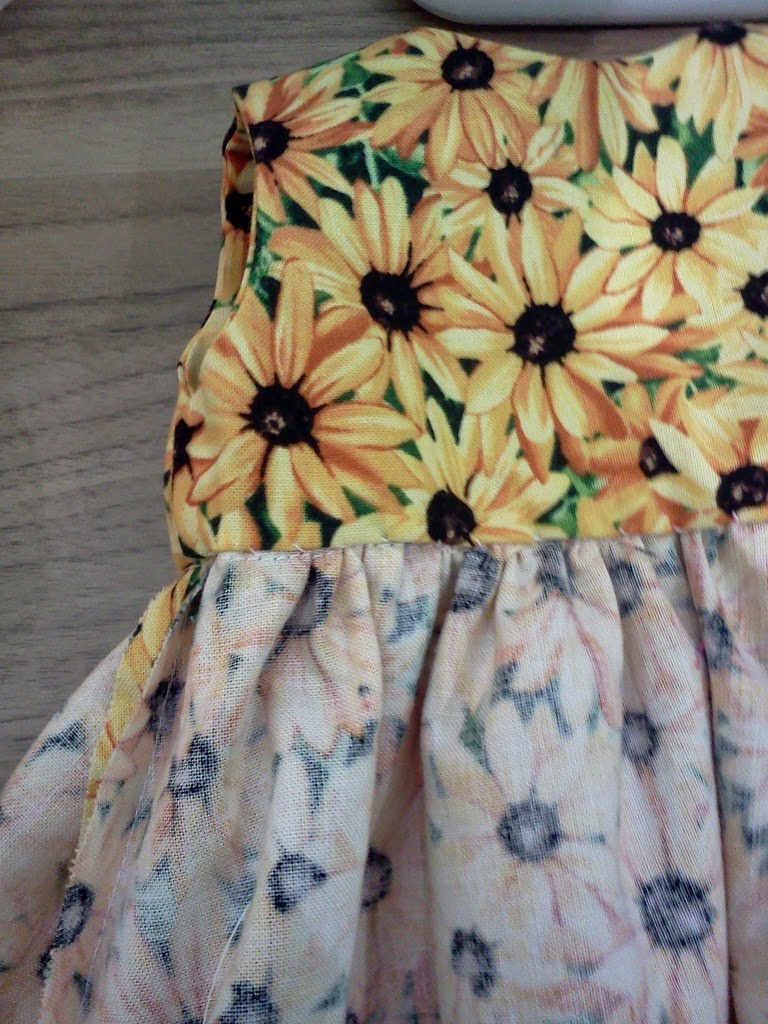
This one I stitched down by hand because I didn't have the right color yellow thread... but it looks good that way too!
You can sew by machine on the wrong side or the right side, but it's more accurate from the wrong side.  The right side looks fine!

 
 Another way of enclosing seams is to add some trim.  On this lined dress I used the same method on the top (without all the fussy turning because this one has tie straps), then I sewed trim to both layers, folded it under and stitched it down.

 
On this little top, I did one layer.  I stitched  on the ruffle, but the raw edges show on the inside... not that most of the little girls will notice but I noticed.  Next time i do this I will use my serger... and see that thread?
 
 
This is where it ended up:
 
That's the leg of my jeans.
I hope you enjoyed my pathetic efforts at a tutorial!  Maybe next time I will remember my camera.
 
Sew on...


Wednesday, August 13, 2014

What's Up Today?


Last night I joined a local quilt guild.

Oh, dear.  Those ladies are amazing... most of them are eons ahead of me on the quilting part.  I do not consider myself a 'quilter' yet.  I'm a 'piecer'.  I love planning and cutting up kits for tops, and I really enjoy sewing the blocks and completing the flimsy.  Once that's done, I'm sort of blah on the interest meter, unless I have a deadline.

Of course I do love a finished quilt!!  I'm a good 'binder', so it's just  that part in the middle, the sandwiching and the quilting, that gets me.  (Honestly, who loves pinning those things together??)

I've been practicing.  I've quilted small things and I'm about to push myself to quilt up some doll quilts for the craft fairs.  Really.  I promise!

My co-leader for the church quilting group is an amazing free motion quilter, and she's given us some demonstrations and some lessons.  I'm putting some of her advice to good use, and I must get myself some of those gloves that help you hang onto the quilt as you're swirling it around in the machine.

Last night a couple of the ladies at the new guild were discussing long arm quilting machines.  Evidently there is one that you could buy if you had about $4,000 you didn't know what to do with, and a large space in your house.  One woman said it wasn't worth it... another said the cost of having a quilt professionally quilted was 'way more than $100'!

OK, I am a financial professional.  If you pay $150 per quilt and you can buy a machine for $4,000, if you make 26 and 2/3 quilts and do them yourself, you have paid for the machine.  I'm not adding the cost of thread or your time, but then I'm not adding tax to the cost of the machine.  How is that 'not worth it'?

I don't know about you but I've pieced way more than 26 and 2/3 quilts over the past 12 years.  And a few of them actually got all the way done.

Of course they also said you can rent time on a machine at a quilt shop too, but that would require planning ahead!  And being 100% prepared before you walk out the door!

Hmm...  I might have to throw out some furniture and make some space!

Sew on...

Tuesday, August 12, 2014

Getting Ready for the Craft Fair Season

A little while ago I asked the question 'where did the summer go?'  I'm starting to PANIC!!

I made a deal with a couple of friends to go into three craft fairs this fall.  Three!!  OMG What Was I Thinking?? 

OK, they're in three different months.  There is some space between them.  I made a rule for myself, one day fairs where the cost to me would be below $50.  You have to sell a lot of $5 items to make that back and show a profit....  And no driving many miles to get there, it has to be in the counties touching the one I live in.  I can't/don't want to add the cost of a hotel room to the mix.

Good plan, right?  And the first one isn't until October.

October!  It's almost September now!

I checked my doll clothing stock.  I have been doing things all along but I put it all in a box and don't think about it again.  Well I guess I'd better start thinking about it!

I put some things up on the design wall, in outfits.  The girls and their moms/grandmoms want things that go together.  I learned last year that you can't just lay out the jeans and tops, you have to put them in sets. 

I need some kind of top to go with that blue and white skirt on the bottom.


The aqua and green striped top, the green top and one pink top came from discarded adult tee shirts.

This is a portion of what was in the box from spring and summer.

I added some other things....


The denim skirt is made from the leg of a pair of jeans worn out by my DH.


I made these patterns up as I went along... wish I had made some notes!


Dresses can be made from scraps, they just take a quarter of a yard each.


These and a few other pieces are all done... I have to sew some tops for the multiple number of jeans and denim skirts I made.  I have multiples of the white pants and skirts too.

I was digging in my stash of tee shirt knits, I need to supplement with some pastel colors, specifically pink and blue plus maybe yellow.  The pajama pants need some tops.  I made some adorable zebra fleece hats and scarves but didn't take pictures. 

My friend Carol and I are working on a plan... our color scheme is pink-purple-aqua-bright green, with denim and red tossed in for good measure.  She's making some things, like robes and aprons, and I'm making others, like the tee shirts and pajamas.  Hopefully when we get together to take inventory, we'll be working on the same plan!  She's working independently so we haven't compared notes yet.  Fingers crossed!

I am a little worried that after the October fair, I'll need to restock and there are only three weeks between that one and the one we're doing in November.  So I'm cutting out huge stacks of basic things like denim skirts and white tee shirts, and I'll keep sewing until it's all done.  Or until I get sick of it?? 

My youngest grand has her eye little on the black and white knit dress in the picture at the top, and this sweater...


I'd make another one, but the reason it has three colors in it is that I ran out of the main color after partway through.  In my sizable yarn stash I have many things that were close, but not close enough!  So I frog stitched it back to half of the yoke, added the other colors, and used the tiny bit that was left over for the base of the hat.  I guess I could do one with different shades of peach or maybe pink and give her this one for Christmas!

I asked my sewing grand if she'd be willing to help me... maybe she could sew some simple pieces like pants, or do hems or something.  She's thinking it over.  I guess she's not motivated to earn any extra cash right now!  But she did offer to make some doll jewelry...  we'll see.

I've said it before and I'll say it again... I wish making clothes for myself was this easy!

Sew on...

Friday, August 1, 2014

Presents!

Yesterday I came home to find the latest present for me from the Loopy Ewe.


I love their little 'box of fun' sticker... here's what was in the box:


This is called Socks that Rock Heavyweight from Blue Moon Fiber Arts, it's hand dyed and the colors are fabulous.  There are three shades of blue/green.  The center skein looks gray but in real life it's kind of celery green and cream.  The colors are from top to bottom:

Dip-It-Us
Winter Solstice
Big Brain Blue
 
Who would not want a yarn called Big Brain Blue??  LOL!

I spent an hour pulling the two dark skeins apart and rolling balls that I can actually knit from. 

I found a pattern I want to make called the Downtown Cowl by Christy Becker.  You can get it free at www.ravelry.com if you're a member.  Sign up, that's free too.

The pattern was designed with variegated yarn in mind... so any one of these would work, but I'm thinking of using a bit of all three.  There's much more than I need for one cowl so we'll see what else I come up with.  Maybe a matching hat...

Also I got a gift from Loopy Ewe with my order!  I love that.


It's a small ball of yarn, a pattern, a button, and some posties so I can mark where I am on the pattern or make notes.

Color me happy.

Knit on....