Friday, August 15, 2014

If I Were A Better Blogger...

I was reading some favorite blogs and thinking about how great some of them are at being instructive and showing their work... I love those blogs (and those bloggers).

Here's what happens to me:  I think about something I want to write about, something that happened, something that I want to save to remember, and then I think, oh gosh, I should have taken a picture of that while I was doing it.

I have a camera or two at home and one in my phone.  I usually have the phone here:


Bottom drawer of my desk, phone in the pocket.  Or next to the back door... to grab on my way out.
I am not into selfies... believe me, the fewer pictures that exist of me, the happier I am.  I could lose a few dozen pounds.  But taking pictures of my work in progress, well, I guess I am not a photographer because I'm usually so busy doing that I forget about recording.

Tonight I was thinking about my craft fair stuff and about how my selling point for the doll clothes is that they're garment quality fabric and well made, machine washable and they will stand up to a lot of play.  How do you illustrate that? 

When you buy clothes, do you look inside to see how well they are made?  I do.  After being burned by garments whose hems get wavy upon washing, or where the seams are so tiny they pull out, I always look inside.  I have a lovely jacket from Coldwater Creek that pulled apart in a back seam, and I am struggling to figure out how to fix that, but that's another blog.  (If I remember to shoot pics while I'm doing it!!)

When making small things, you use a correspondingly small seam allowance.  Instead of sewing and trimming you just cut smaller.  A doll's armhole is only about 2-3 inches long, and the curve is quite sharp.  So when I sew dresses, instead of using facings I will cut double front and back bodices, then sew each one separately only at the shoulder seams, leaving the side seams open.  I put them right sides together and sew up the center back, around the neck and down the other side.  Then I sew both armholes.  Then I CAREFULLY clip into the curves up to but not through the stitching.

Since I didn't take any pictures of this process, I made some VERY crude drawings... I'm sure you can find some much better pictures on YouTube somewhere if you don't understand what I've got here...
This actually says "1/4 inch seam allowance, flat bodices right sides together. and it's #1 in the circle.
 Then I turn the piece right side out through the bottom of the bodice front.  I press very carefully because the pieces are so small and you can burn your fingers.  Well, I can...

The paper says Wrong side, honestly, I can spell. 
 The result is that you have a bodice with all curved edges enclosed.  I then turn it back inside out and put the side seams right sides together and sew up the lining and down the right side on each side and press that.  That's in illustration 2 above.  See my arrows with the sewing direction on them??  ;-)  You are sewing the front and back together at this point, but you're sewing lining to lining and bodice to bodice  -- bodice first, up over the armhole seam and down the lining, or vice versa.

Sew the top to the skirt by putting the top inside the skirt right sides together.  Sew the skirt to the bodice but not to the lining.  Ugh, my scanner!!
 
After pressing and turning right side out again, I put the top, right side of bodice against the right side of the skirt.  The skirt will be inside out at this point.  If it's a gathered skirt, I pin the heck out if it to keep it together and to keep the gathers smooth.  I also make sure the lining is pulled away from where I'm sewing so it doesn't get caught.  These pieces are SMALL so go slowly and carefully!

Insert the waistline seam into the bodice...that last word is topstitch.
 
The last step is to tuck down the bodice lining, fold it over and topstitch it to the skirt.  Depending upon how much is showing between the lower armhole and the top of the skirt, I may turn under a little more than a quarter inch for this seam.  And because I hate messy, I like this method that covers up all the raw edges. 
 
Here it is in real life:
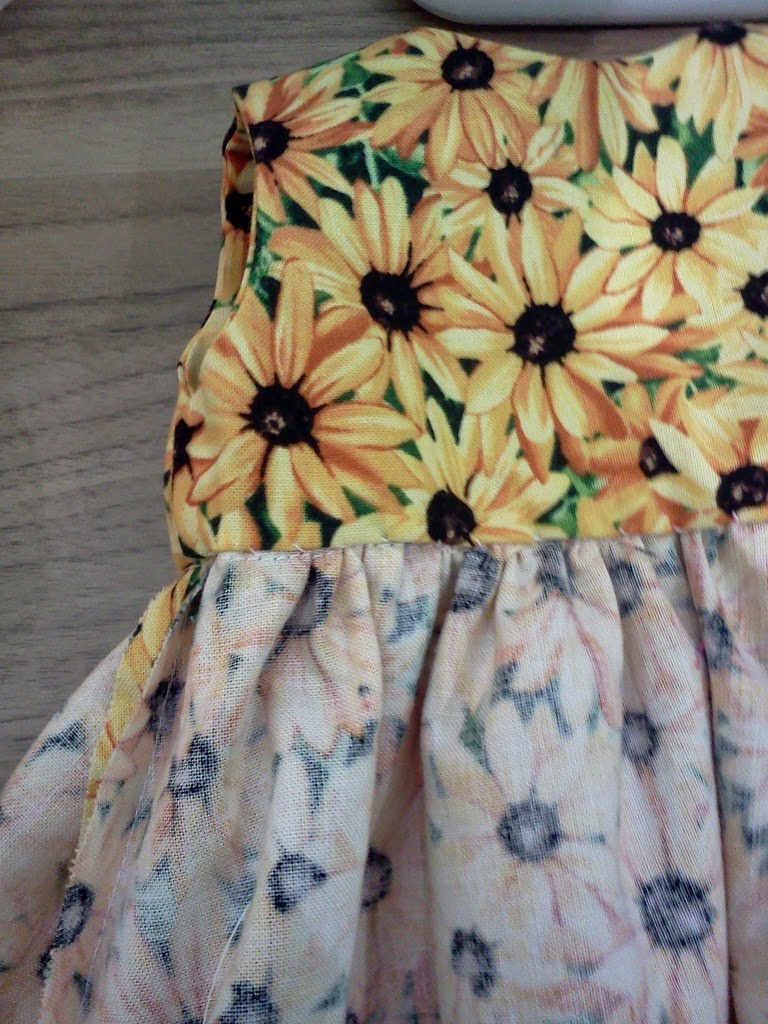
 
This one I stitched down by hand because I didn't have the right color yellow thread... but it looks good that way too!
You can sew by machine on the wrong side or the right side, but it's more accurate from the wrong side.  The right side looks fine!

 
 Another way of enclosing seams is to add some trim.  On this lined dress I used the same method on the top (without all the fussy turning because this one has tie straps), then I sewed trim to both layers, folded it under and stitched it down.

 
On this little top, I did one layer.  I stitched  on the ruffle, but the raw edges show on the inside... not that most of the little girls will notice but I noticed.  Next time i do this I will use my serger... and see that thread?
 
 
This is where it ended up:
 
That's the leg of my jeans.
I hope you enjoyed my pathetic efforts at a tutorial!  Maybe next time I will remember my camera.
 
Sew on...


Wednesday, August 13, 2014

What's Up Today?


Last night I joined a local quilt guild.

Oh, dear.  Those ladies are amazing... most of them are eons ahead of me on the quilting part.  I do not consider myself a 'quilter' yet.  I'm a 'piecer'.  I love planning and cutting up kits for tops, and I really enjoy sewing the blocks and completing the flimsy.  Once that's done, I'm sort of blah on the interest meter, unless I have a deadline.

Of course I do love a finished quilt!!  I'm a good 'binder', so it's just  that part in the middle, the sandwiching and the quilting, that gets me.  (Honestly, who loves pinning those things together??)

I've been practicing.  I've quilted small things and I'm about to push myself to quilt up some doll quilts for the craft fairs.  Really.  I promise!

My co-leader for the church quilting group is an amazing free motion quilter, and she's given us some demonstrations and some lessons.  I'm putting some of her advice to good use, and I must get myself some of those gloves that help you hang onto the quilt as you're swirling it around in the machine.

Last night a couple of the ladies at the new guild were discussing long arm quilting machines.  Evidently there is one that you could buy if you had about $4,000 you didn't know what to do with, and a large space in your house.  One woman said it wasn't worth it... another said the cost of having a quilt professionally quilted was 'way more than $100'!

OK, I am a financial professional.  If you pay $150 per quilt and you can buy a machine for $4,000, if you make 26 and 2/3 quilts and do them yourself, you have paid for the machine.  I'm not adding the cost of thread or your time, but then I'm not adding tax to the cost of the machine.  How is that 'not worth it'?

I don't know about you but I've pieced way more than 26 and 2/3 quilts over the past 12 years.  And a few of them actually got all the way done.

Of course they also said you can rent time on a machine at a quilt shop too, but that would require planning ahead!  And being 100% prepared before you walk out the door!

Hmm...  I might have to throw out some furniture and make some space!

Sew on...

Tuesday, August 12, 2014

Getting Ready for the Craft Fair Season

A little while ago I asked the question 'where did the summer go?'  I'm starting to PANIC!!

I made a deal with a couple of friends to go into three craft fairs this fall.  Three!!  OMG What Was I Thinking?? 

OK, they're in three different months.  There is some space between them.  I made a rule for myself, one day fairs where the cost to me would be below $50.  You have to sell a lot of $5 items to make that back and show a profit....  And no driving many miles to get there, it has to be in the counties touching the one I live in.  I can't/don't want to add the cost of a hotel room to the mix.

Good plan, right?  And the first one isn't until October.

October!  It's almost September now!

I checked my doll clothing stock.  I have been doing things all along but I put it all in a box and don't think about it again.  Well I guess I'd better start thinking about it!

I put some things up on the design wall, in outfits.  The girls and their moms/grandmoms want things that go together.  I learned last year that you can't just lay out the jeans and tops, you have to put them in sets. 

I need some kind of top to go with that blue and white skirt on the bottom.


The aqua and green striped top, the green top and one pink top came from discarded adult tee shirts.

This is a portion of what was in the box from spring and summer.

I added some other things....


The denim skirt is made from the leg of a pair of jeans worn out by my DH.


I made these patterns up as I went along... wish I had made some notes!


Dresses can be made from scraps, they just take a quarter of a yard each.


These and a few other pieces are all done... I have to sew some tops for the multiple number of jeans and denim skirts I made.  I have multiples of the white pants and skirts too.

I was digging in my stash of tee shirt knits, I need to supplement with some pastel colors, specifically pink and blue plus maybe yellow.  The pajama pants need some tops.  I made some adorable zebra fleece hats and scarves but didn't take pictures. 

My friend Carol and I are working on a plan... our color scheme is pink-purple-aqua-bright green, with denim and red tossed in for good measure.  She's making some things, like robes and aprons, and I'm making others, like the tee shirts and pajamas.  Hopefully when we get together to take inventory, we'll be working on the same plan!  She's working independently so we haven't compared notes yet.  Fingers crossed!

I am a little worried that after the October fair, I'll need to restock and there are only three weeks between that one and the one we're doing in November.  So I'm cutting out huge stacks of basic things like denim skirts and white tee shirts, and I'll keep sewing until it's all done.  Or until I get sick of it?? 

My youngest grand has her eye little on the black and white knit dress in the picture at the top, and this sweater...


I'd make another one, but the reason it has three colors in it is that I ran out of the main color after partway through.  In my sizable yarn stash I have many things that were close, but not close enough!  So I frog stitched it back to half of the yoke, added the other colors, and used the tiny bit that was left over for the base of the hat.  I guess I could do one with different shades of peach or maybe pink and give her this one for Christmas!

I asked my sewing grand if she'd be willing to help me... maybe she could sew some simple pieces like pants, or do hems or something.  She's thinking it over.  I guess she's not motivated to earn any extra cash right now!  But she did offer to make some doll jewelry...  we'll see.

I've said it before and I'll say it again... I wish making clothes for myself was this easy!

Sew on...

Friday, August 1, 2014

Presents!

Yesterday I came home to find the latest present for me from the Loopy Ewe.


I love their little 'box of fun' sticker... here's what was in the box:


This is called Socks that Rock Heavyweight from Blue Moon Fiber Arts, it's hand dyed and the colors are fabulous.  There are three shades of blue/green.  The center skein looks gray but in real life it's kind of celery green and cream.  The colors are from top to bottom:

Dip-It-Us
Winter Solstice
Big Brain Blue
 
Who would not want a yarn called Big Brain Blue??  LOL!

I spent an hour pulling the two dark skeins apart and rolling balls that I can actually knit from. 

I found a pattern I want to make called the Downtown Cowl by Christy Becker.  You can get it free at www.ravelry.com if you're a member.  Sign up, that's free too.

The pattern was designed with variegated yarn in mind... so any one of these would work, but I'm thinking of using a bit of all three.  There's much more than I need for one cowl so we'll see what else I come up with.  Maybe a matching hat...

Also I got a gift from Loopy Ewe with my order!  I love that.


It's a small ball of yarn, a pattern, a button, and some posties so I can mark where I am on the pattern or make notes.

Color me happy.

Knit on....


Thursday, July 31, 2014

Goodbye, July!

Well, where did the summer go??  I don't know.  But I'm looking at the calendar and it's not that long until Labor Day.

What have you accomplished this summer?  Do you feel like being outdoors instead of inside sewing?  Maybe you can sew while looking out the window, or even on a porch!  I would get more done in the summer if I could do it near an open window.

I finished up a couple of projects I had going:

  • Sewed top, layered and bound my aunt's blue quilt (quilted by my friend Suzi)
  • Cut at least ten kits for the church quilting group (and recut the big squares for two after an error was discovered!  Does that count as 12!)
  • Made three sets of binding strips, sewn and pressed
  • Hemmed three blouses of mine that fit but were too long
  • Sewed about a dozen AG doll outfits
  • Knitted five AG doll sweaters
  • Repaired two stuffed dinosaurs and one piggy from Angry Birds
  • Cleaned up and reorganized the church guild's storage cabinet, with help from Suzi, Bonnie and Shirley.  Wow we're so organized now!
I also totally misread the Joann's flier last week.  I went in on what I thought was July 28 to get the big roll of batting that was on sale and it turns out it was actually July 29!  Bummer.  I hadn't gone to work on Monday so Tuesday FELT like Monday!

I also made another blankie for Miss A.  She was over and helped me pick out squares to sew together.  Then she picked out a border.  After that we picked out a fleece that served as both batting and backing.  She said if we did this, she would use it for sleeping and stop carrying around the ratty old blankie that she's been dragging everywhere for seven years.

Today she came over and was sleeping on the couch when I came downstairs for work.

With both blankies...

Sew on!

Tuesday, July 22, 2014

Sitting on Quilts

Do you remember a book from probably the 80's called "The It's OK If You Sit On My Quilt Book"?  It was written by Mary Ellen Hopkins, who at the time was a quilting teacher and innovator who made it easier for women to do what they wanted to do.

She also wrote A Log Cabin Notebook, Connecting Up, Continuing On, and other books that built on the skills learned from It's OK If You Sit On My Quilt.


I was thinking about that on Sunday, sitting on quilts.  Our Pastor is doing a four part series where he's preaching on the lessons that can be learned from children's books.  Four different books are being read during the children's message that happens just before the sermon starts.  The books are being read by different teachers from the preschool and Sunday School. 

He asked if it was OK with our quilt guild if he took out one of our quilts to have the children sit on it during the reading.  I said, I think it's exactly the right thing to do!  I think quilts should be sat upon!  And used.  And loved.

The first book was Chicka Chicka Boom Boom.  This is one of my youngest granddaughter's favorite books.  It's about the lower case letters of the alphabet and how they follow each other up a tree.  There are too many of them and they all fall out.  Their parents, the capital letters, come and rescue their little darlings.  It's a fun read.  The book is brightly colored, and it coordinated with the brightly colored quilt he chose to use.

The second book was Goodnight Moon.  Anyone who's ever had a child that didn't want to sleep has read them Goodnight Moon. Quilts and going to sleep... a natural fit!


The third book was The Very Hungry Caterpillar.  This Eric Carle book is probably familiar to quilters, as there was a lovely bright colorful fabric line made to coordinate with the book a few years ago.  A child could have book and quilt together.  Eric Carle also uses pieces of brightly colored fabrics in his illustrations for the other books he wrote.


It's my privilege to read the last book this week.  It's Shel Silverstein's The Giving Tree.  I do love Shel Silverstein's work... Where the Sidewalk Ends was one of the favorites to read when my daughter was small. 

I had never read The Giving Tree.  It must have been some lack in my upbringing, because I think the book has been around for a while...

It's a lovely story.  But you know if you have read Silverstein that he illustrates his books in line drawings.  No color!  I wonder if I need a black and white quilt??  How quickly can I sew it up??  LOL!

The quilts I make are definitely for sitting on.  I don't quilt for posterity, just for people I love, so if you have one of my quilts, I hope you're using it for the purpose it was intended --

Or as Fonzie used to say, Sit On It!!

Sew on...

Tuesday, July 15, 2014

Routines

I was sitting at my desk at home last night, thinking about how I've gotten into a rut...  it's good to have a routine, but when does it go from healthy, organized routine to stuck in a rut?

I get used to doing the same things the same way, and that's nice, like putting on comfortable shoes, or visiting a friend you've had for a long time.

But sometimes I get bored.  I want something different.  This morning I was having my first cup of tea and visiting my usual blogs.  Reading about Judy's chickens always makes me smile, and I love Rita's take on just about anything.  There are great quilting and sewing inspirations to be had, and I love looking at the knitting progress.

Some of my favorites write every day or nearly so.  It feels like catching up with a friend.  But what do you do when someone you're used to catching up with stops posting?

Rita had some family emergencies, and she posted that she was taking a 'blog break'.  I sent her my sympathies and told her I was keeping her in my thoughts and prayers.  We all have had those times when we just didn't feel like talking to anyone.  We need those rest periods.

One of my other 'daily visit' blogs hasn't had a posting since June 8 or so.  I worry.  This person has a job and family and I'm not part of that, but I miss reading about her and what she's doing.  Dang it!  I want to know what's going on!  Should I be concerned, or is she just on a world tour??

Ha... you know that old saying "It's none of your business".  Hard to take.  I miss her.  What's she doing?

Time to get a life, you say?  You bet!

It's not like I don't have things to do either. 


I have been wanting to make myself some new summer pants for months.  I have scheduled myself to be in two craft fairs in the fall, selling my doll clothes.  I have expenses to organize and submit for things I did six months ago.  I should schedule a couple of doctor appointments for check ups.  Why do I care whether people post daily or not??


I guess the routine has turned into the rut.  I need to shake things up, get on another track.

 
Tracks.  I should walk more.  Maybe lack of exercise is causing lack of oxygen which is causing brain rot.  Get moving!

I'm going to take my own advice today and take a walk at lunchtime.  I hope.  If the phone doesn't ring at noon and if I don't answer it.


Rock on!

Monday, July 14, 2014

Summer School 2014

 
My smallest granddaughter is attending summer school this year.  There are four four-day weeks, the first one was last week.  She went to Writer's Workshop.  She said they made wood, but I think they made paper... and learned how pencils are made and did some creative writing.  She's between first and second grades, so I'm not sure how complex they get in four days.

This week she came to see me before school for items from my recycling bin.  They're working on art projects from recycled items.  I didn't have much because hubby empties the recycling bin on a regular basis and the trash was picked up last Friday.

She had a bag filled with toilet paper tubes and tissue boxes and other things.  I contributed a soda can and a plastic bottle and two magazines.

I was going to get her some fabric scraps but I didn't have time and her bag was pretty full.  I can't wait to see what she brings home!

Maybe tonight I'll dig out that bag of tiny balls of yarn too small to use anywhere else!

Craft on...

Wednesday, July 9, 2014

On the Design Wall

Two posts in one day!  One on finished and one on unfinished objects -- make sure you read both posts (my loyal followers, all six or seven of you...)

Cut Apart Nine Patch... needs a border but I'm sort of blocked on the color.

Scrap quilt, leftover floral 2.5 inch strips with tans between. I had enough to make a pattern.  This one is only 44 inches square.  I would like to make it bigger but I don't know what I want to add for now.

Same pattern, more scrappy because I didn't have five of every print.  Again, a small size, I'm not sure where to go next, enlarge or just finish and donate somewhere.
 
Sew on...

One More Finished

This is the fastest finish in my recorded history!

My aunt She-Who-Doesn't-Sew was talking about beds about a month ago and said she needed a lighter quilt for her bed in the summer.  My other aunt had a pile of blue fabric pulled out of her stash, and SWDS said she didn't care what the pattern was, so we cut blocks of blue.  I should say I cut, because I'm the designated cutter.

When we had a pile, I said I think I have the perfect pattern at home, blue and white, blue blocks surrounded by white, bound in blue, and asked what she thought of that.

Sounds fine.

The next day I dug out the white and started cutting.  We were going to work on it on Fridays but I needed to see whether it was enough white.  I started sewing.  by the end of the day, a top was finished.


I blogged about it then.  Here's the top, unpressed and tossed over the back of my couch.

The next week I took it to Friday night and we layered it with batting and backing.  I took it home because I couldn't convince anyone else to do it.  Our expert quilter had a ton of work to do and couldn't get to it for a while.

I was talking about trying to quilt it myself at church the next Sunday.  The lady who does the quilting for our group has been taking lessons at WCTC from a teacher named Chris Kirsch.  She's been really enjoying the classes and she does a beautiful job. 

She offered to quilt my quilt.  Bless her heart!  It was made for a full sized be with a 12 inch drop all around to be used as a bedspread type of cover.  I offered to pay her but she said no -- she was doing it for enjoyment.  I will find some way to repay her.  (I have been helping her layer and pin her own personal work for the last couple of weeks, trying to work off the debt I owe her!)

She gave it back to me this week and last night I got it bound.  DONE!! WHOO HOO!!

 
I sewed a label on the back with blue thread in the bobbin... I carefully placed it so it's in the middle of one of the blue squares and you cannot tell from the front where it is.  I should have sewed it into the binding but I didn't think that far ahead.  I hand wrote it with a sharp permanent marker.


I just have to deliver it now.  I'm sure she'll be thrilled, I am completely impressed with the finished product if I do say so myself.  I think Suzi's quilting was the frosting on the cake.  Or maybe the whole cake!!


Sew on...

Monday, July 7, 2014

Vacation Projects

I took last week off at work, hoping to get some projects done and some errands run.

Here was my list pre-vacation:

Road trip to Vogue Fabrics in Evanston for pants fabric
Sew some pants for myself from acquired fabrics
Renew passport
Stock up trip for beauty supplies (I'm out of shampoo, etc)
Lunch with the aunties
Buy some new patio doors
Spend some time with the grands

Here's what I actually did:

Spend some time with the grands
Lunch with the aunties
Lunch with the grands
LOOK at some new patio doors
Clean up yarn stash
Organize the church quilt group cabinet
Help a friend pin four quilts

Yes, I'm still out of shampoo...

Here's one of the projects the girls and I did.


We saw this on one of those local news magazines that come on at 9 a.m.  Of course theirs were done by adults with very precise placement of dots on stem-less wine glasses.  They were classy!  They had tiny little dots very closely spaced, it must have taken a while to do.

Ours were done with whatever nail polish we had.  I was not too worried about how they turned out because I purchased all of these glasses at the Goodwill store for $1 or less each.  That's why I have two different sizes.  I think I have more somewhere, but they must be packed away.

We had a great time choosing different polish colors, and then dotting them, either with the nail brush directly on the glass, or in the case of Miss A, she used a Q-tip dipped into the bottle.  And of course it was a race to see which of the girls could do the most glasses!  I think the polish will stay on, even in the dishwasher.  But if not, we know how to do touch-ups!

Craft on...


Thursday, June 26, 2014

Multiple Color Knitting

Intarsia.  I think that's what it's called. 

intarsia or tarsia  (ɪnˈtɑːsɪə)
 
n
1. a decorative or pictorial mosaic of inlaid wood or sometimes ivory of a style developed in the Italian Renaissance and used esp on wooden wall panels
2. the art or practice of making such mosaics
3. (in knitting) an individually worked motif
 
[C19: changed from Italian intarsio ]

This is from the website dictionary.reference.com.

Intarsia knitting is when you knit a 'motif' in one color on the background of another.  So you have to manipulate two (or more) strands of yarn, make sure you leave no holes, that nothing shows on the front that shouldn't... it can be simple or get complicated.

Mine is complicated, at least for my previous level of knitting.


Thus far this is probably the most complicated thing I've done... I had to make those thumbholes and work with four needles in a tiny spot to do it.


Oh and there was this hat... rounds of different colors.  But only one color at a time.

So now I'm attempting to knit a Christmas stocking for a co-worker's grandson.  The person who knit all the previous stockings was my co-worker's mom, and she has dementia and doesn't knit anymore.  I think I blogged before about the stockings she did for the others.  There were Santas and snowmen of various kinds, some in red and green and some in blue and white with red and green accents.

This is the pattern for the one I'm making.


Yes, it looks upside down, which confuses me sometimes.  But I'm knitting it from the top down.
 
So the white band at the top is where the name goes.  Then you start with three rows of blue background, and pick up some black for the top hat.  The next addition is red for the hat band.  Then more black for the hat brim, followed by white for the heads.
 
You knit front and back at the same time and fold in half.  After tearing out a few times I was SOOO tempted to just knit the front snowman half and make the back all blue!  But I am soldiering on...  here's my progress so far:


Yup, at the point of adding the top of the hat band.  It's slow going.  I now have seven 'bobbins' dragging along the back.  I discovered that it isn't wise to carry a color across more than about four stitches of another color.  The opportunity for snagging, tension issues and error is just too great.

Here's the back:


And with the bobbins:


I stopped at 10:00 p.m. to watch the news and because I rediscovered that it's very hard to knit at night on black and dark blue...  something I should have remembered because it's hard for me to sew at night on those colors too!

Duh.


So what does it say on that bookmark?  "This is where I fell asleep"?  This is where I stopped and went to bed.

Six or seven inches done... only about 18 more to go!

Knit and sew on...