Showing posts with label Project. Show all posts

Wednesday, December 3, 2014

Treasures in Knitting

The one I knit
The one I used as an example.
My last post about knitting the Christmas stocking showed you the results of the knitting.  I delivered the stocking on Wednesday of last week, just in time for the Thanksgiving reunion of the family for whom it was knitting.


This week my co-worker said the family who saw it was impressed.  Everyone came to his house for the holiday except the family of the little boy for whom the stocking was intended!  His poor mom had some sort of stomach ailment and was throwing up in the car on the way, so they went home again.  Aww... I'm so sorry she was ill, but I'm glad she was wise enough to go home and be comfortable in her own home until she's better.

So when my friend asked what he owed me, I had to say nothing.  No money changed hands.  And the reason is treasure!  Yes, treasure.

Not gold or silver or even jewels.  Gems for sure though.

When his mother stopped being able to follow a pattern to knit, she left a stash of some size.  He had asked me last week if I was interested in any of it.  That's what happens when you are known to be a crafter, people bring you stuff.  Sometimes it's trash, sometimes it's treasure, sometimes it's a mixed bag.

Speaking of bags, there were several of those.

 
Inside of this bag was a big surprise!
 
Ruth was evidently quite the knitter.  There were at least six projects that were not finished.  The first one I came across was a rug, knit with Aunt Lydia's Rug Yarn, in blue and white.  Quite patriotic!
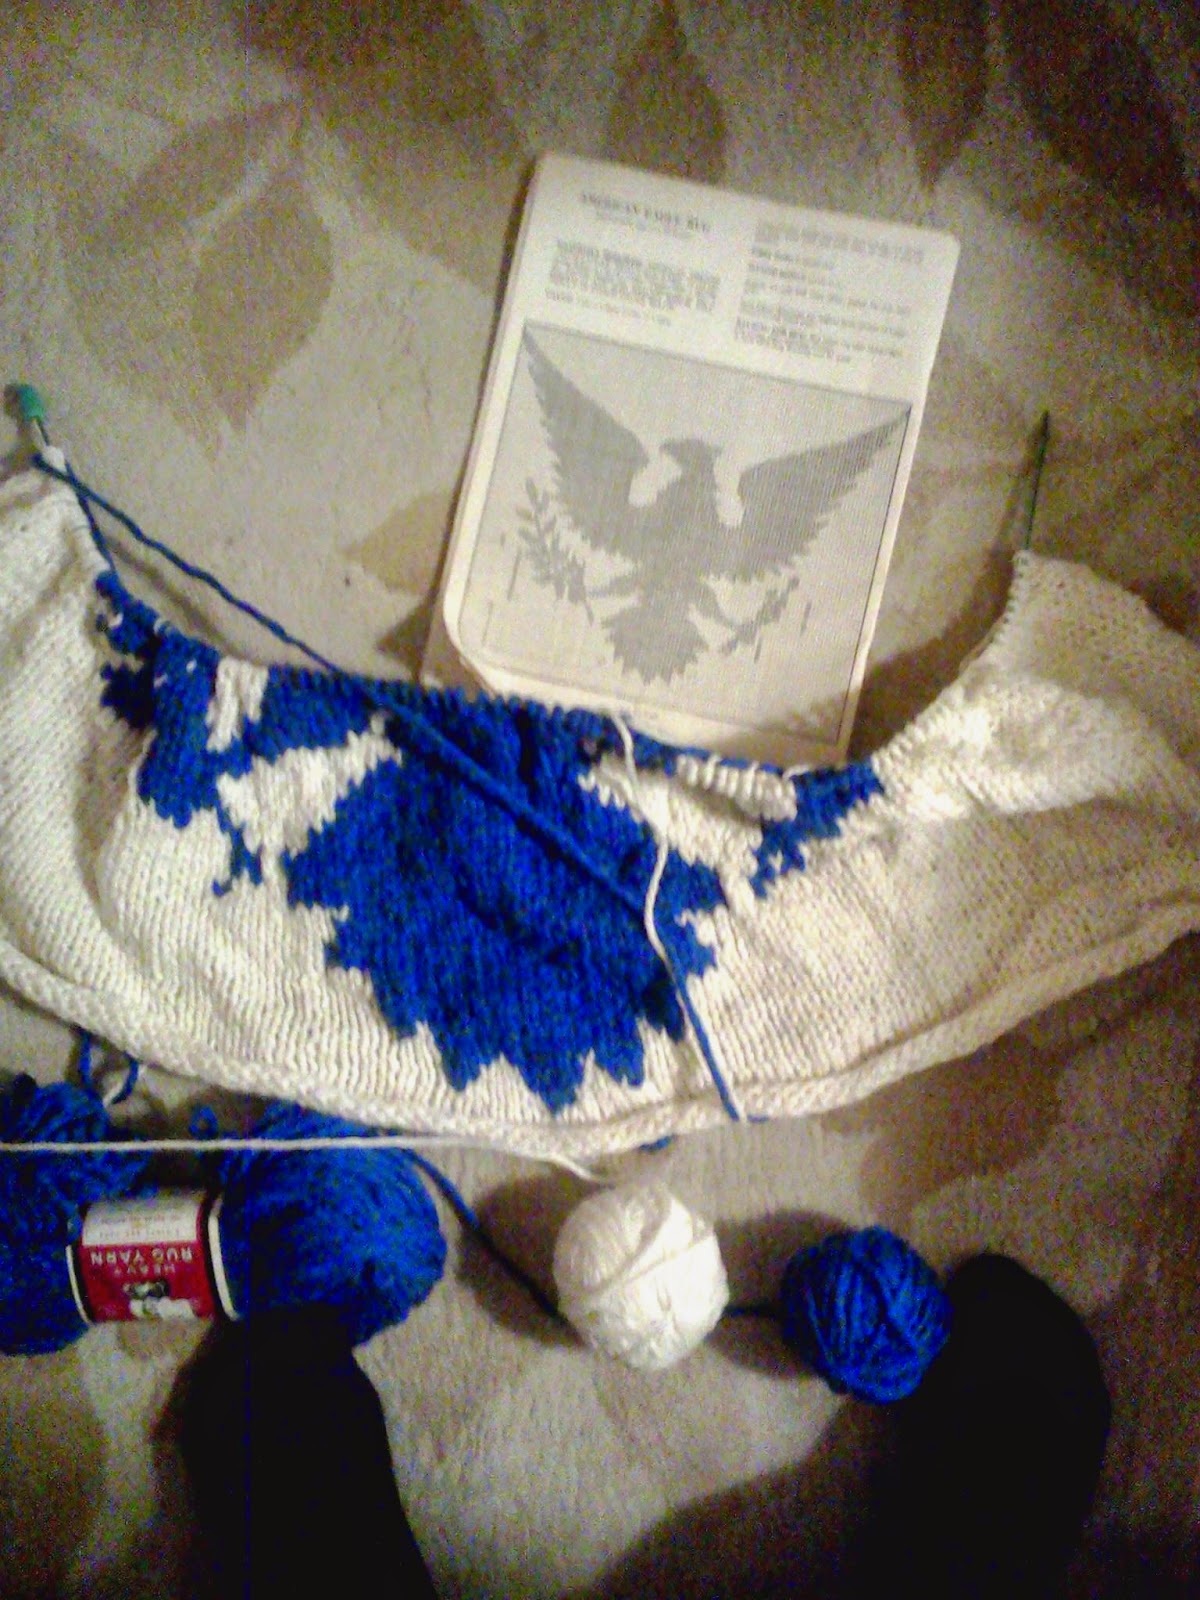


The pattern was in the bag too.  The book it's in is from about 1976.  You know why patriotic themes were popular that year!  (Hint:  anniversary of important date in history... 'nuf said.)


It's only two colors, right?  My daughter, Alex P. Keaton young republican, likes this one very much.  She thinks I should finish it right now. 


Maybe after Christmas...

Another project was a blanket with a Raggedy Ann and Andy theme.  This one is knit with sport weight yarn.  For non-knitters, that's skinny.  Think many more stitches per inch than the rug or even the stocking!  Plus all those intricate details!  Ugh, not my thing.  If it's yours, and you think you would like to give it a go, send me an email and I'll gift it to you!


 I'll show you more of the stash in another post.  It's been sorted, the bits and scraps have been tossed, the little balls that might be big enough for a doll item have been organized.  A large bag of miscellaneous partial skeins were donated to the preschool at church for projects.  And I feel rich in potential projects!

Of course I now realize that not only do I have my OWN UFOs... I own Ruth's too!

Mixed blessing indeed.

Knit on...

Wednesday, June 18, 2014

On The Knitting Needles

A coworker saw me knitting in the lunchroom one day and asked me if I could knit a Christmas stocking.  I can knit socks, and my 'no' was broken that day, so I said sure, probably! 

He's a granddad and his mother had in the past knit stocking for the entire family to hang on the mantle during the holidays, but she has dementia and is no longer able to knit.

He brought in her folder and a picture of all of the stockings she has made, and one actual stocking for me to see.

It's pretty awesome...

My camera has a dead battery so this is a scan, it's folded in half, and the toe is showing up at the left corner.
This is charted knitting, something I hadn't attempted before.  Last night while watching Rizzoli and Isles I thought I'd do a gauge swatch and see whether the letters would look decent.  The child's name is Krewe (pronounced like "crew"), and it's from the family's ancestry somewhere.

Here's my chart:

The stocking is 55 stitches wide, folded in half.  So that means you have to fit the letters into half the number of stitches or 27.5.  Leaving at least one stitch on either side and disregarding the half stitch, that leaves 25 stitches for the letters K-L-E-I-G-H.  (Pronounced 'klee').

The chart for the alphabet showed all letters being four stitches wide.  Four times six is 24 plus five spaces between letters is 29.  Too big.  I had to skinny up some of the letters.  K and G didn't work but the rest of the letters did, so I got it down to the proper size, at least on paper.

Of course if you're a knitting, you know that you read the chart upside down in this case because it's a top down pattern.  Mom had actually written out the stitch by stitch instructions to the other names in her folder.  As in "Row 4:  k1r, k2w, k1r" for knit 1 red, knit 2 white, knit 1 red"... etc.  I can totally see why she would have done this!  Once you get into the snowman pattern, this would come in  so handy!

Then there's the whole knitting with two colors thing.  You have to twist the yarns around each other in order not to leave a hole in the knitting.  And don't pull too tight or the letters bunch up, and not too loose or they stretch out resulting in a different kind of hole.  I had to stop at some of the more exciting spots in the TV show during this part!

My gauge appears to be OK, and my letters are even decent. 


Of course I didn't read the directions completely so I cast on too many stitches (64 instead of 54) so I have overhang, and the name was supposed to be on the OTHER side of the seam, so I'm glad I was using this for gauge instead of it being the real deal, or I'd be ripping it all out and starting over!

All in all, I'm pretty pleased.  Now I just have to buy a skein of blue yarn because of all the colors I have in the stash, that's the one I don't have in sufficient quantity.

Can I knit this before Thanksgiving??  Don't know, but I'm giving it a try!  This much took me most of an hour last night.  No, I'm not showing you the back.  It's not bad, but it's not great.  I hope this gets easier, and I've been watching knitting videos on YouTube.

I've got more projects in the works, a few quilts going, and I cut out some pants for myself last weekend.  It will be a busy summer!

Knit and sew on...

Thursday, November 1, 2012

A Little Light Sewing!

While I was off work on my medical leave, I was looking for some small projects to occupy a little time and not strain the brain, or other organs.

Before I went to the hospital, one of the church ladies called and asked if I would like to make some things for the craft fair on November 3.  Now I had planned to do some reading, some knitting, and not too much else.  But I felt better after about a week, and wanted to just BE in my sewing space.  I'm sure some of you know the feeling, when you've been gone for a while.

I had grand plans.  I was going to finish up my 'fix it' pile (I hate the term "mending"...).  I was even going to refashion a lovely jacket I bought that was several sizes too large.  Needless to say, I did a few fix-it projects and quickly tired of that.  I did sew badges on the Daisy vest for Miss A.  But I was itching to CREATE.
Now, I've posted about my extensive book and pattern collection, and about my church quilting group's receipt of boxes of drapery samples in the past.  What could possibly bring these two together?  

Hmmm... remember that bag of zippers I got at the fantastically priced web site www.wawak.com?  Oh yeah, I decided to channel Mary Mulari! 

Bags for various things, using drapery fabric, old denim, and some remnants of faux suede and other fabrics.  Note the denim bag with the red/white/black trim... those are the discarded tail ends of zippers, strictly for show!
I had lent my book to someone so I was working from memory, but I have done Mary's flat zipper technique a bunch of times, so it came quickly back after the first try.  I had some patterns and some I just 'faked'.  How can you go wrong with a rectangle or a square.

The bag at the top is a fussy-cut circle from a particularly pretty sample piece.  Here it is a little more close up.


Also in the first picture are these bags, from a piece I really liked.  There's just something about roses...

These will hold glasses, cosmetics, whatever, and look pretty doing it!
Here are a bunch in some black striped fabric left over from a pair of trousers I made (who knows when?  but I kept the pieces!)


The front bag is black denim from a pair of worn jeans, as is the fourth one back.  The trims are bits left over from a quilt binding or two.  The pulls are tiny strips cut from a piece of faux suede.  The piece is folded in half and the fold gets pulled through the hole in the zipper pull and looped over the ends.  Tighten up and you're good to go!

There will be about 25 of these for sale at the church craft and book fair on Saturday.  If you're in New Berlin, Wisconsin, stop by and pick up a few.  The proceeds from the sale will benefit the preschool.  We have to pay for the new security system.

Oh, and I also made Miss A's Halloween costume.  She wanted to be a ghost.  Spooky but not TOO spooky!!


Here she is with big sisters Bumble Bee and Mad Hatter! 

Sew on!


Sunday, September 30, 2012

Baptismal Dress, Part II

I blogged a while back here about a project I took on this summer... the transformation of a wedding gown


into a baby's baptismal dress.


The baby is due in early November, and this weekend seemed like a good time to get started.

Since this dress came from a rather well-known bridal shop in the area, I really wanted to do this right and NOT mess up.  I studied the pattern and picked out all the pieces I needed, cutting them free from the sheets of tissue and reading all the directions.  The sleeves are rather puffy, and I found an oval shaped pattern piece to make inserts to keep them upright.  This heavy bridal satin may not require that piece but I'm ready if it does!

The mom-to-be wants me to use the embroidered lace for an overskirt.  It's beaded so this might create some challenges, but I'm thinking that one over.

Saturday afternoon, bravely clutching my Gingher serrated edge bent trimmers, I approached the dress to begin dis-assembly.  I cut off the lace overlay at the empire waist, and trimmed it away from the zipper.  It's not one piece!  It's actually a kind of U shaped affair, with the edge trimming around the outside edges of three sides.  Hmmm...  needs some thought.  It's a very soft tulle with floral motifs attached at various places.  It's got three seams and is narrower at the top than at the hem.

Next I removed all the buttons, and set them aside.  Mom also wants me to use the bow from the waist at the waist of the baby gown, so that came off and was also set aside.

The skirt had a cut-on train, bustled up with small buttons and button loops half way down.  I bit the bullet and started removing the skirt at the empire waist, again cutting around the zipper.

Laying this out on my cutting table, I saw that the panels of the dress are wedge shaped, in typical 'flared skirt' style.  The back panels are about two yards long, but they flare out, and the top of the panels are only about 10 inches wide.  Oh, and only part of each is on the straight of grain.

Lucky me, there are three seams where the seam allowance is more than 1 inch wide!  If I can steam out the stitching lines that will give me extra fabric.

The pattern for the baby skirt is a big rectangle, or rather two rectangles, one front and one back.  Placed on the fold of normal yardage, this is not a problem.  Placed on the fold of a bridal gown with flared seams, this will be a challenge for sure! 

I ran into an issue with the bottom of the train being a bit dirty.  You can tell the skirt dragged a bit on the ground when the bride was walking, dancing, doing what brides do.  There were also a couple of spots where something must have spilled.  Since I'm not laundering this fabric I had to cut around those spots.

The main skirt pieces of a baby dress are the largest, so I placed those first, and cut around them but not on the cutting lines.  Then I examined the remains for the best parts for sleeves and bodice pieces.  The dress had a pretty good under-skirt, and when I removed about 8 yards of netting, I had enough to cut the entire lining from it.

I'm going to pick up some satin ribbon to trim the bodice and see if I can find a little bit of lace to trim the sleeves.  The lace in the overlay is too large for that so I'll see if I can find something soft that will resemble the overlay.  And there are two design lines on the bodice front that I thought I could trim with some one inch satin ribbon and maybe one of two of the smallest flowers from the overlay.

It's starting to come together in my head pretty nicely!  Once my camera battery is recharged I'll add some photos.

Sew on!

Tuesday, August 21, 2012

Last Thing On The List

Way back a couple dozen posts ago, I started writing about things that inspired me or were important in my sewing journey:  Mrs. W, a white coat, and some other things.  The last thing on the list was the Jean Jacket Remake.

I bought a rather expensive jean jacket about seven years ago from Coldwater Creek.  It was expensive even though I bought it on sale, because it was made of a soft tencel fabric, I guess you could say it was denim in color only.  However, like most jean-style jackets it felt like it was too short on me.  I am long-waisted, and I normally add 2 inches to the length of tops and dresses.


This jacket was a major disappointment when I got it home.  I loved the fabric, and everyone in the world had a jean jacket -- except me.

I studied it for a while, hung it in the closet and pouted.  The catalogs were showing such cute combinations of jean jackets and floral skirts and dresses...  oh pooh!


I saw a Mary Mulari episode of Nancy's Notions where Mary extended the bottom of a sweat shirt cardigan with a fabric rectangle.  Hey, if she can do it on a sweatshirt, why can't I do it to this jacket?  It's just hanging there getting no use anyway, right?

I cut some batik rayon fabric into rectangles and finished the short ends.  Then I got out the scissors and cut the bottom band off the expensive tencel jean jacket.  I took out my serger.  The bottom of my jacket was longer than the width of the batik fabric, so I made two strips and overlapped them at the center back.  This would be more comfortable anyway, as it will allow for my wider hips.

You can just see above the date in this photo where the panel I added on this side angles toward the side seam.  I top stitched the seam allowance toward the batik panel.

OK, this was a totally gorgeous piece of batik, but with the fabric at the bottom it sort of looked like a patch, and not in a good way.  The secret to doing this type of makeover, according to Pauline Richards, is to put that same fabric somewhere else on the garment and make it look like it's supposed to be there.

I had a pretty good sized piece of batik left over, so I experimented with putting a piece on the pockets, on the cuffs, and finally settled on covering the collar.  That was a pretty simple operation.  I traced the collar onto tissue paper, creating a pattern.  I added seam allowance, cut it out, and hand stitched it to the jacket.

The fabric was very soft, and I didn't add any interfacing because the collar was as stiff as I wanted it to be.  The fabric easily conformed to the collar shape.  After 7 years it still looks very nice.

Here's the finished project:


I cut the cuffs off, finished the sleeve ends with the serger and folded them up twice for a casual look.  I wear this all the time with black slacks and a white tee shirt for casual Friday at the office.  With the black pants it's dressier than jeans and more appropriate for my downtown office.  I have also worn it over a solid navy tank and skirt, or my white summer Capri pants.

So I saved it from going into the Goodwill bin after one wearing, and have justified the money spent to purchase it by making it versatile, comfortable and more my style.

What are you remaking or restyling?

Keep on sewing!


Sunday, July 15, 2012

Finished Projects and Utility Sewing

This weekend, while my DH was busy tearing out the carpeting in our upstairs, I worked on some projects that had been nagging me for completion...

I fixed a small hole in the back of a pair of DH's blue jeans.  How exactly does one tear through the place between the center back seam and the back pocket?  And it wasn't so much a tear as it was a worn out spot, about the size of a dime, with some sort edges around it.  I think it was the process of making the fabric look aged that did it.  So I cut a small piece off an old pair that I've been using for patches and stuff, and pinned it to the inside of the jeans.  The patch was much lighter in color than the jeans, so I figured I'd sew it to the inside and it would be less conspicuous.  You're going to be able to tell they were mended either way, but the thread sewn on the outside was closer in color than the patch.

So I zigzagged around the edges to secure it, then I sewed back and forth across the length of the patch to make sure it stayed secure.  I used the pinking shears to cut the patch, so I'm sure it won't fray too much but I sewed the daylights out of it just in case it decided to wiggle itself loose!  I'm sure it's a strong patch, and if anything the jeans will spring another leak (hole) in some other, non-reinforced area!

Then I made a tent bag.  SIL brought me a 'present' a couple of weeks ago.  "Can you fix this?" he always asks. 


Sadly, sometimes the answer has to be no, like the times when HIS jeans tear a quarter inch away from one of the flat felled seams and there's nothing to sew a patch to...  but in this case, the tent bag was so torn and thin, I couldn't save it. 

I found some twill in my stash.  I must have planned to make some boy pants or something, this stuff was S.T.I.F.F.!!  So I cut two layers about the size of the tent bag, and did a big, double flat felled seam on the side and the bottom.  I made the outside layer  about a half inch shorter than the inner layer, and folded both layers over on the outside at the top.  The longer, under layer got folded over again about a half inch, to make a clean finish on the outside.  I stole the drawstring from the old bag, inserted it in the casing, and viola!!  New tent bag!


I know, totally not sexy, but it will do the job.  Now if he gets work in Iowa (he's an iron worker and travels where they're building) he can stay in his tent and not have to pay for a motel room.  It's not an impressive project, but he really liked it!


Next I sewed the three outer borders to my DD's quilt.  This project has been on the back burner for a while.  It's folded in half on my design wall because it's queen sized.  I think it's big enough for a drop on either side of the bed and at the end, but I have to check the measurements.  I might have to put on one more border.  Then it can go off to the quilt shop for finishing.  There's no way I'm machine quilting anything this big!!


Last but not least, I put the final border on the Bargello from Hell wall hanging.  This photo is before the final 4 inch brown border was sewn on all four sides.  Now I just have to piece a back, because it is wider than the backing fabric I bought.  I have some strip sets left from the interior pattern, so I'll probably piece those together for a large center block and put the brown and teal polka dot fabric around the edges.  I'm going to try to quilt this on my home machine.  Maybe...

My final finish this week was Jennifer Chiaverini's book, The Union Quilters.  It was a good story, about how the women left at home during the civil war supported themselves and each other with and through their quilting.  I know there's another of her books that refers to this time period.  I don't recall which one it is, but some of the plot lines are echoed in this book.  It's a good stand alone story, but I think you could benefit some by having read the other book.

Hope you're staying cool in the hot weather.  We got about a quarter inch of rain on Saturday, not enough to save the grass or help the corn.  I guess if I want to see green, I'll have to work on the Phone Guy's Wife quilt blocks!

Happy summer, and keep sewing.

Thursday, January 5, 2012

Product or Process?

Are you a product person or a process person??  How do you know which one you are?

By my definition, a product person is one who will not necessarily start a new project while the last project is incomplete.  This type of person likes to see a finished item put to use.  They would be very happy owning one pair of knitting needles because they would not dream of starting a second scarf in a different color while the first scarf is still being knitted! 

On the other hand, the process person is one who enjoys part of all of the process of any craft.  To use a knitting example, the process person may be happiest picking out patterns and buying yarn.  Maybe they have even started projects.  They may love learning new stitches, or the way the project feels rolled up in their lap during the knitting.  But they may be proud owners of 76% of a sweater in blue and 22% of a pair of red socks.

You can usually tell at a glance which person you're dealing with... baskets of yarn overflowing in several rooms, needles stuck into skeins on the coffee table?  Process.  One carefully loaded knitting bag next to the favorite chair?  Project.

I am a process person.  I freely admit that my stash of fabric, yarn, embroidery floss, craft supplies, exceeds the conceivable number of projects I can do in my lifetime.  But as someone once said if his own wife's works in process, it's a lovely pile of stuff and could be considered decorative in some circles.

My cousin Amy is a project person.  I piece a quilt top, fold it, and ponder its beauty.  Amy will make the quilt sandwich, machine quilt it over the weekend, bind and label it like lightning!  Her UFO pile is almost non-existent!! 

Did I mention that process people and project people don't understand each other??  Like Venus and Mars, baby!  She's thinking "why can't you finish this one before you start another one?" and I'm thinking "boy, the woman is an overachiever for sure!!"

Bless Amy and the other project people... sometimes we can convince them to finish OUR projects because they'd rather do that than stare at a UFO!  Oh, and THANKS!!