Any time anyone asks my age (if they're brave enough, or rude enough) I usually respond "I'm 39!"
The last time I did that my son said "ha-ha, Mom, I'm 43..."
Smart aleck.
So when my aunts and cousins went to a retreat and the pattern was called "39 and Counting", I had to buy it.
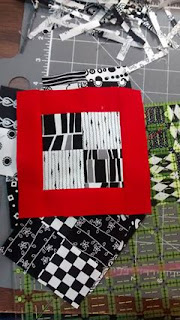
The pattern is really cute, the bands of bright colors make the blocks look like they've been cut apart, maybe like a cut apart four patch.
My problem with this pattern is the cutting directions. I cut pretty accurately -- if I do say so myself, and with the quarter inch foot on my machine I piece pretty accurately too.
This pattern was written for people who might find that challenging, so it's overcut and you trim everything down at each step. Not that there's anything wrong with that! Eleanor Burns has been doing it for years! I know people for whom this is the only way you end up with the right sized finished block. Heck, I've done that myself.
The directions say to cut strips, then sub-cut into squares, rectangles and larger rectangles. Pair them up and sew the pairs.
 |
| Step one, sew four patches. |
 |
| Step 2, trim them down to 3.5 inches. |
Urgh... why not just cut the pieces 2 inches wide to begin with?
I will admit that you get a nice, crisp edge by sewing first and cutting later, but it seems like so much work, cutting and sewing and re-cutting!
Next step is to take the bigger rectangles and sew them into pairs.
Then you take your feature color and cut strips. How big? Don't know... doesn't say, but when you've got all four sides sewn it should be trimmed to five inches.
Math. There should be math!! Here's the math: 5 inches minus 3 inches (finished size of four patch) is 2 inches. Add a half inch for seam allowance (1/4 on each piece). That's 2.5 inches. Half of that is 1.25 inches.
Answer: Cut the colored strips 1.25 inches wide.
To test this I took a strip from my 2.5 inch bin, cut it in half (very accurately!) and applied it.
Yep, measures 5 inches.
Since I had a big pile of red strips, and I love red, I used just one color instead of doing the rainbow effect. Originally I had intended to do green, but I was in the moment! (And there were more red strips than green ones anyway...)
A word about stripes...If you think about it when you do your four patch, you might be able to get the stripes to all line up the same way. My main concern was getting the dark in the right corner, so that didn't occur to me until I sewed this block. But I don't really care that much since they're all sort of wonky that way!
After applying the shorter of the borders, you -- wait for it! TRIM AGAIN! Add the longer pieces, and square the whole block up to 8 inches. You have now trimmed 1/4 inch off EVERY SINGLE PIECE OF THIS BLOCK.
I filled my small trash can with shavings. If I were a paper maker I'd have had an awesome start on some black and white stationery.
(No! No! I AM NOT starting up on another craft!)
I have to add a last red border to two sides of all of the blocks, and then a red border to whatever side gets left out that way. I used the 'sash as you go' method, even though I'm not doing cornerstones. I like it because you get a more accurate and flatter sashing sometimes, and the seams get hidden in the quilting.
I edited my own copy of the pattern to adjust for the cutting of right sized strips. The pattern says to start with 2 1/4 inch strips, which I had to cut because I don't have those in my bins... but I could have used 2 inch strips (which I DO have precut) and saved myself a blade. However if you think your seams are going to end up bigger than 1/4 inch, and you want to fudge something, you can just fudge the bright colors and save yourself some messing around. Not to mention all those shreds left over!
This is going to be a lovely quilt when it's done.
Sew on...


